LET'S TALK ABOUT 3D SCANNING |

|
Have you ever wondered why your 3D scanner won’t capture the surface of certain objects? Or have you become frustrated by getting an incomplete 3D scan and scratching your head trying to figure out what you did wrong? Various 3D scanning technologies exist, i.e. structured light scanners, laser scanners, and photogrammetry, yet all have challenges due to the limitations of physics such as light passing through transparent objects. The surface of the object can make 3D scanning challenging. The below objects are usually challenging to 3D scan.
1. Highly-detailed objects When capturing highly detailed objects, it is essential to ensure that the 3D scanning parameters are adjusted to capture sharp edges and intricate details accurately for the best results. The default scan parameters may not always capture these elements with sufficient detail and high precision. However, by customizing the settings, you can obtain an accurate 3D model that faithfully represents the object without losing any important details. One crucial setting to adjust is the point distance, which determines the resolution of the scan. By selecting a smaller point distance, you can achieve a higher resolution and capture finer details even for medium-sized objects. The EinScan Pro Series multifunctional 3D scanner is an excellent choice for scanning detailed objects, offering an adjustable resolution of up to 0.2mm. With this scanner, you can reproduce intricate details with highest accuracy, ensuring a high level of precision in your 3D models captured as a .stl file. Furthermore, the EinScan Pro Series provides efficient 3D scanning capabilities and a user-friendly experience, making it an ideal solution for capturing highly detailed objects with ease. 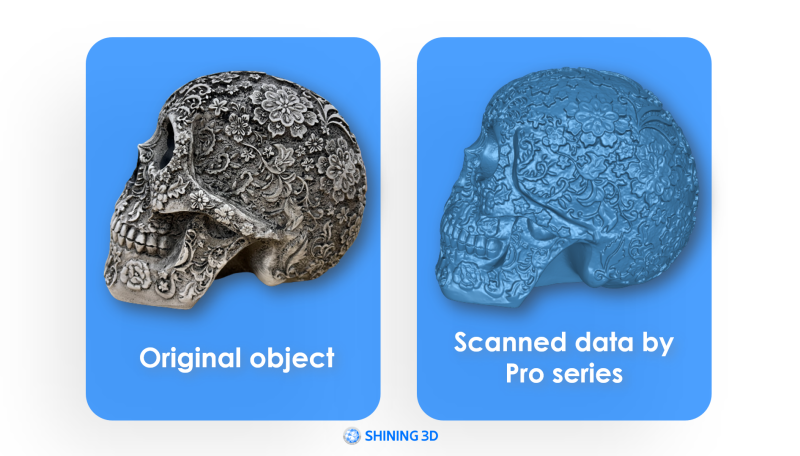 If you require a 3D scanner capable of capturing intricate details, a desktop 3D scanner would be a suitable choice. Among the recommended options are the EinScan SE, EinScan SP, Transcan C, EinScan Pro Series set up on a tripod. The Transcan C, in particular, offers an impressive resolution of up to 0.035mm, ensuring excellent detail reproduction. It's important to note that the highest resolution scans result in denser point clouds, which means more data and larger file sizes. Additionally, the software will take longer to process a greater amount of data. Therefore, it is generally recommended to use fine resolution settings for small or medium-sized objects. Scanning larger objects with a desktop 3D scanner or tripod setup can be time-consuming and labor-intensive as well. Before choosing a scanning method, consider the size of your objects. Finding the right balance between scan quality and efficiency is crucial. Assess the trade-off between the level of detail required and the time and resources available for scanning larger objects. By carefully considering these factors, you can select the most appropriate scanning method for your specific needs. 2. Dark surfaces If you've encountered difficulties in 3D scanning dark objects, you're not alone. Dark surfaces pose a common challenge in the 3D scanning process due to their high light absorption. Just like wearing a dark-colored shirt under the sun, dark colors absorb more light, which makes it difficult for 3D scanners to accurately capture their surface details. To overcome this challenge, there are a few techniques you can employ. One approach is to attach adhesive markers or targets to the object. These markers act as reference points that assist the 3D scanner in tracking and aligning the scan data. Another option is to apply white powder as simple as baby powder or Aesub Blue 3d scanning spray to the dark surface, which helps enhance the reflection of light and improve scan results. However, these methods can be time-consuming, and messy, and may not be suitable for delicate objects. Fortunately, not all light sources are created equal, and certain 3D scanners offer better performance when scanning dark surfaces. A more powerful laser and the use of blue light can be effective in capturing dark objects. Blue light has a narrower wavelength compared to white or red light, allowing for better resolution and detail capture. The EinScan HX is equipped with powerful laser lines and blue LED light in its fast mode. This combination of technologies enables efficient scanning of dark surfaces without the need for markers or white spray. In just minutes, the EinScan HX can produce high-quality scans, even for objects as challenging as a black lion sculpture. By utilizing advanced 3D scanning technologies specifically designed for dark surfaces, you can achieve accurate and detailed scans without the additional steps of applying markers or powder. 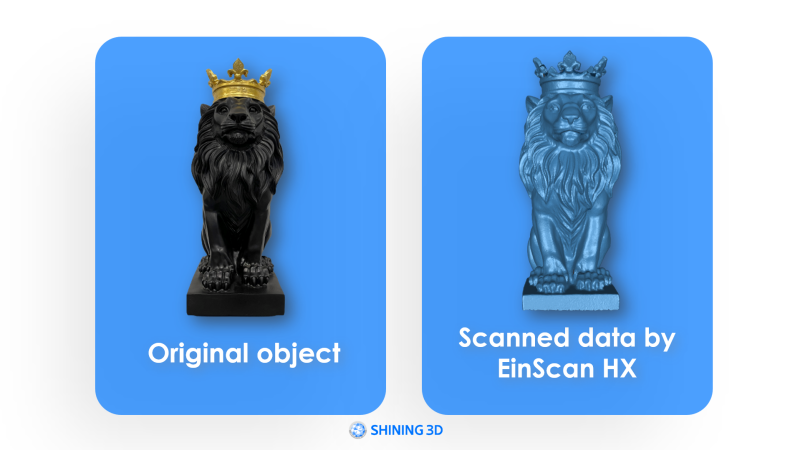 3. Reflective or shiny surfaces Scanning objects with siny and reflective surfaces present another common challenge in 3D scanning. While dark surfaces absorb light, shiny surfaces, such as mirrors or shiny metal parts, disperse and reflect light in various directions, making it difficult for 3D scanners to accurately capture the object's details. Remember how 3D scanners work. 3D scanners project light onto objects, and measure how the light is returned or deformed, but reflections make it impossible to read. In industries like machinery or automotive, shiny and metallic parts are often scanned, necessitating specific techniques to overcome this challenge. Markers and the power of the light source play crucial roles in scanning shiny surfaces. A more powerful and high-quality light source significantly improves a 3D scanner's ability to capture data from shiny objects. In some cases, especially with medium and large-sized objects, markers may be necessary to ensure excellent scanning results. Using magnet markers can provide a quick, easy, and non-destructive removal solution as well. The EinScan HX, equipped with a powerful blue laser light source and marker recognition capability, is designed to address this 3D scanning challenge. Among all the EinScan Series 3D scanners, it is the only one capable of effectively capturing shiny objects. Its advanced features enable successful scanning of metallic surfaces, as demonstrated in the example below. 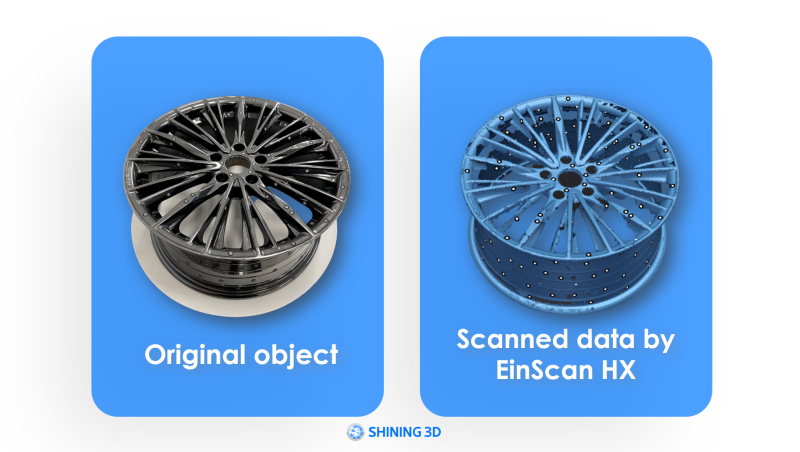 4. Colorful object When scanning brightly colored objects, it is crucial to ensure accurate representation of the object's color information in the generated data for good results. This heavily relies on the pixel count or digital resolution of the texture camera used. Pixel count is typically measured in megapixels (MP), where one MP equals one thousand pixels. Insufficient camera resolution can result in color distortion and loss of detail. The good news is that all EinScan 3D scanners can capture texture data. The EinScan H and HX models come equipped with built-in color cameras, while the Pro Series offers color capture functionality through an optional color pack add-on. Different 3D scanner models offer varying camera resolutions to accommodate different budgets and specific use cases. For those seeking the highest level of color detail, the Transcan C 3D scanner is the ideal choice. It features an exclusive 12-megapixel texture camera, offering superior color detail with its higher pixel count. With the Transcan C, you can expect to capture the finest color details and achieve excellent color accuracy in your 3D scans. 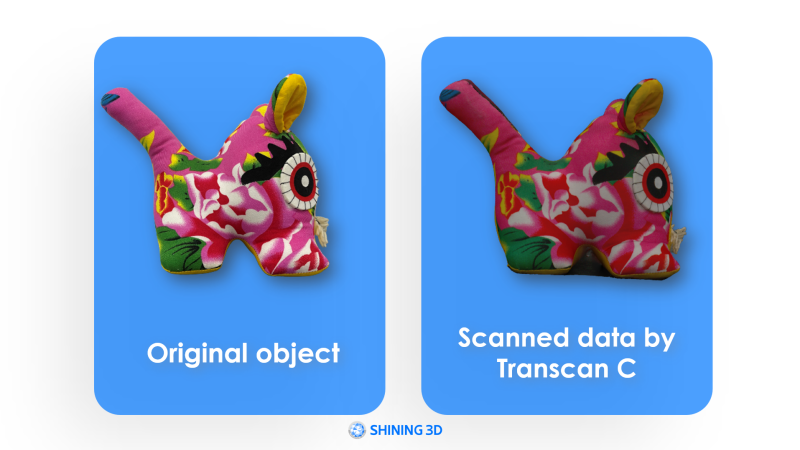 5. Scanning humans When it comes to 3D scanning the human body, there are three key challenges that need to be considered: (1) maintaining stillness, (2) avoiding direct light in the eyes, and (3) successfully capturing fine details such as hair. Firstly, it is crucial for the subject to remain as still as possible during the scanning process. Even the slightest movement, such as blinking or shivering, can introduce inaccuracies in the final 3D model. Secondly, some scanners utilize intense LED lights that can be uncomfortable or temporarily impair vision if directly exposed to the eyes. This can cause discomfort and hinder the scanning experience. Lastly, capturing the intricate details of human hair presents a challenge due to its thin nature and the potential for it to blend together or appear less defined in the scan. Fortunately, specialized 3D scanners have been developed to address these specific challenges. The EinScan H2 and Einstar are excellent examples. These scanners incorporate "non-rigid" algorithms in their software that automatically compensate for slight body movements, reducing the impact of any minor shifts during scanning. Additionally, they utilize infrared rays instead of LED lights or lasers, eliminating any discomfort or vision impairment. Infrared technology proves effective at capturing both dark and light-colored hair, ensuring accurate representation of fine hair details in the resulting 3D scans. When it comes to body 3D scanning, the EinScan H and Einstar, along with their dedicated software, serve as efficient and reliable allies, helping overcome the challenges associated with scanning the human body. As you can see below, EinScan H will give you much more detail than the Einstar. 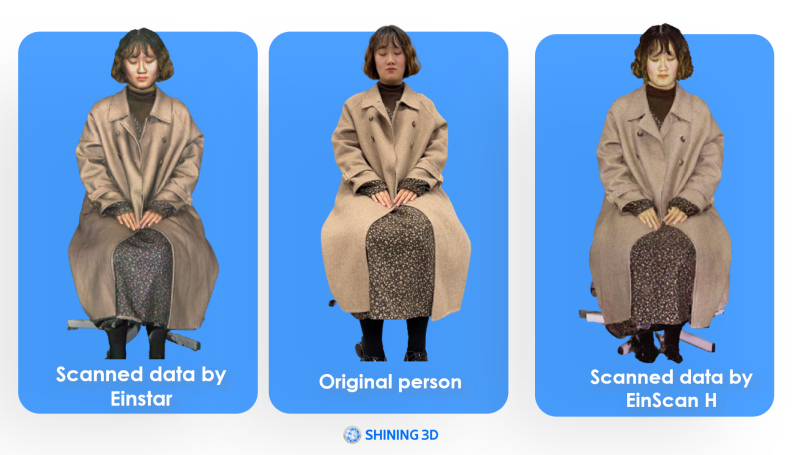 Conclusion Despite the challenges posed by certain surfaces, to get the final result you want is possible by employing the right combination of hardware and software solutions. The EinScan series offers a wide range of 3D scanners designed to accommodate various situations and budgets. Each scanner within the EinScan lineup possesses unique features and specifications, making them suitable for different users and applications. Whether you're scanning complex surfaces, intricate details, or specific objects, there is an EinScan 3D scanner that fits your requirements. If you find yourself uncertain about scanning a particular surface or need guidance in selecting the most suitable scanning solution, don't hesitate to reach out to Growshapes! Our team is available to provide assistance and support to ensure you choose the optimal scanner for your needs. For those interested in delving deeper into the world of 3D scanning, we invite you to explore our webinar titled "Things You Should Know Before Buying a 3D Scanner." This webinar offers valuable insights and knowledge to help you make informed decisions. You can also refer to this blog "Which handheld 3D scanner is best for me?" We are committed to providing you with the necessary resources and support to ensure your 3D scanning endeavors are successful and tailored to your specific needs. To try before you buy, contact us too! Growshapes the official U.S. distributor of Shining 3D EinScan 3D scanners. We now carry the eviXscan 3D scanner from Evatronix as well!
See the innovators on Growshapes’ social media channels to get the latest expert news on innovation in 3D digitization, then share your thoughts and join the conversation about 3D digital innovation with #digitize3D
0 Comments
The new version of the ExScan software ExScan 3.7 compatible with EinScan Pro 2X/2X Plus/2X 2020/Pro HD is now available. It is updated enhanced digital toolkits and adds exciting new features that will enable you to speed up your scan editing & mesh optimization as well as empower you to do more things efficiently! 1. Enhanced Point Cloud Editing Point cloud editing now has become easier with enhanced selection of editing tools including Rectangular and polygon selection tool, the “Cutting Plane” function and the “Connected Domain” selection function.  2. More Tools to Optimize Your Mesh The Mesh Optimization function has been redesigned to create clean meshes fast and easily. The mesh optimization has now a broader range of selection tools to enable you to edit like a pro. 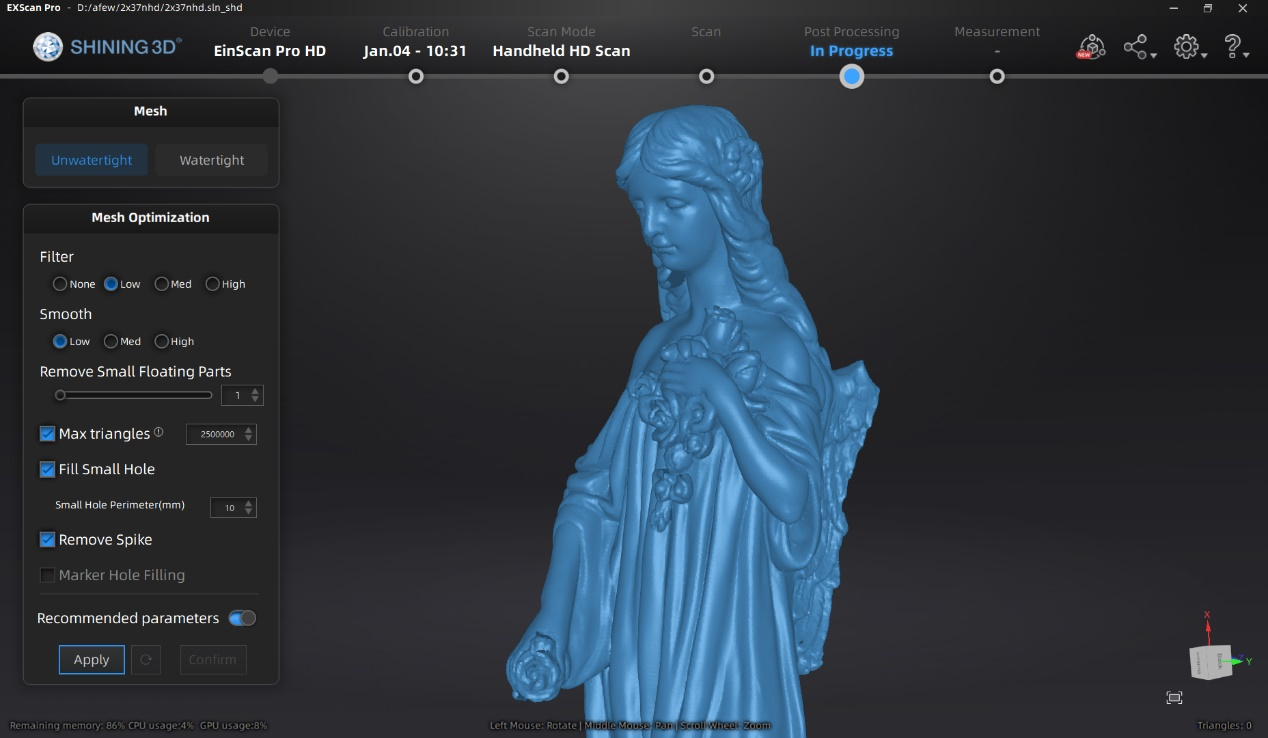 3. New File Manager The file manager has been redesigned to access your files more efficiently. 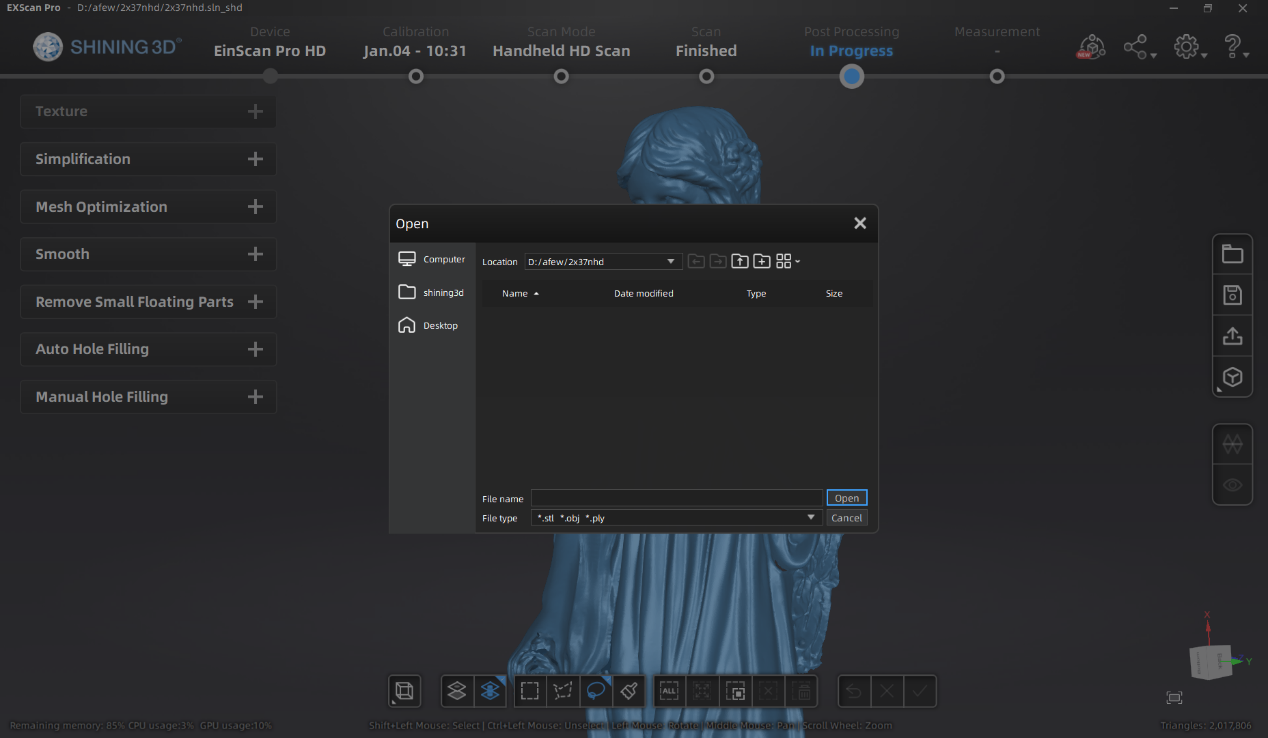 4. Global Optimization as a separate step
5. User Account Center In order to provide users a platform for scanner management and learn about all things EinScan, the all new User Account Center has been added. By downloading ExScan V3.7, you will get a free user account to get the software started. Offline activation is accessible without contacting support person now as well. Please make sure your device is connected for log in and activation. Finally, please make sure your NVIDIA graphics card has the compute capability of 5.0 or above by checking your graphics card capability from here: https://developer.nvidia.com/cuda-gpus#compute Growshapes the official U.S. distributor of Shining 3D EinScan 3D scanners. We now carry the eviXscan 3D scanner from Evatronix as well!
See the innovators on Growshapes’ social media channels to get the latest expert news on innovation in 3D digitization, then share your thoughts and join the conversation about 3D digital innovation with #digitize3D |
GrowshapesProvider of leading edge 3D scanning products and services. We see 3D! Archives
July 2024
Categories
All
|
 RSS Feed
|
Vertical Divider
GROWSHAPESStay connected |
Menu |


|
©2024 Growshapes LLC. All rights reserved.