LET'S TALK ABOUT 3D SCANNING |

|
Every once in a while, it’s important to revisit the basics to understand how 3D scanners work. In this blog post, we’ll cover the Field of View (FOV) of a 3D scanner and how it affects the 3D scan results. The key takeaway is that different 3D scanners have different FOVs, and choosing the right model is crucial to getting the right output depending on the size of the object you want to 3D scan. What is Field of View (FOV)?Like how humans can see a certain range (you can't see behind you) at a given moment, different 3D scanners have a different viewable area at one time from a specific distance. The larger the FOV, the larger area the 3D scanner can 'see' thus capture at once. With the EinScan 3D scammer models, there is a variety of scanning range among different 3D scanner models that scan something as small as a coin to something as large as a car. Therefore, it is important to understand what you are scanning and what FOV is most suitable to capture the details of the object. 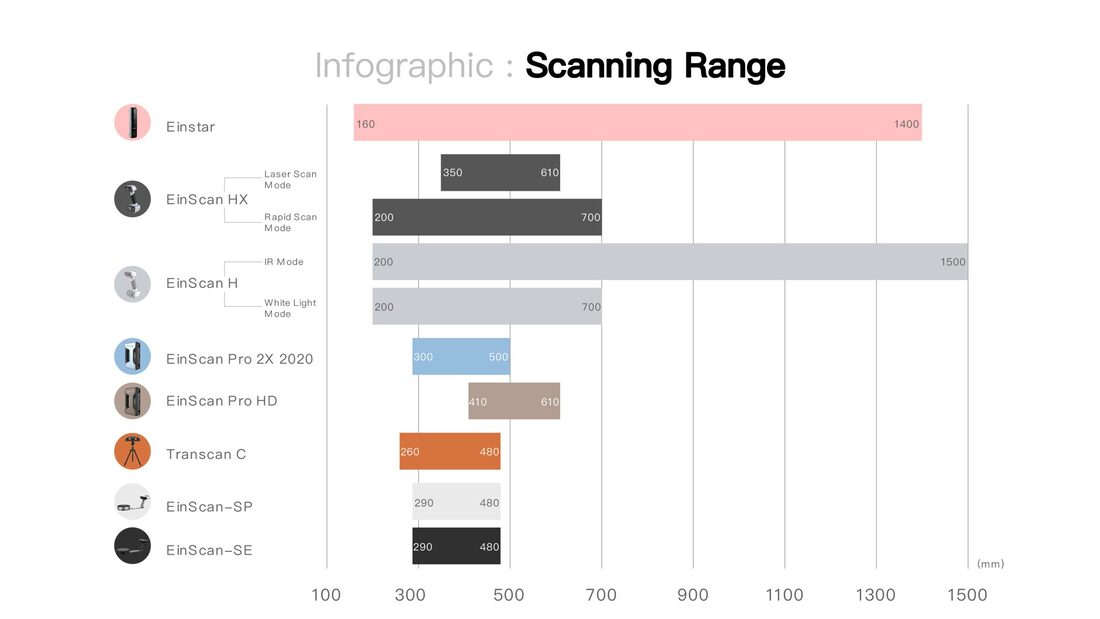 FOV of Different EinScan 3D Scanner Models The FOV of a 3D scanner can determine which model is best suited to 3D scan your object depending on its size. Choosing the right field of view is about finding the right balance between capturing enough detail of the object you want to scan and appropriate coverage for each scan. This balance is important so you can achieve a smoother scanning experience, complete scans in a shorter amount of time as well as reduce computer crashes that happen when the software is overloaded. 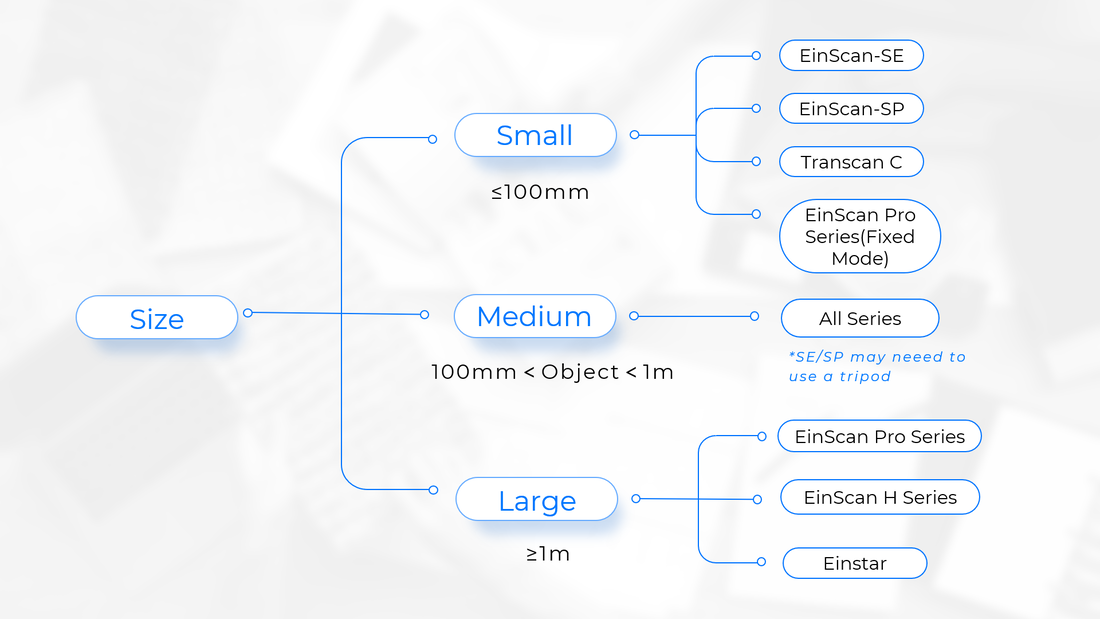 Target Object Size and Suitable 3D Scanner Models
|
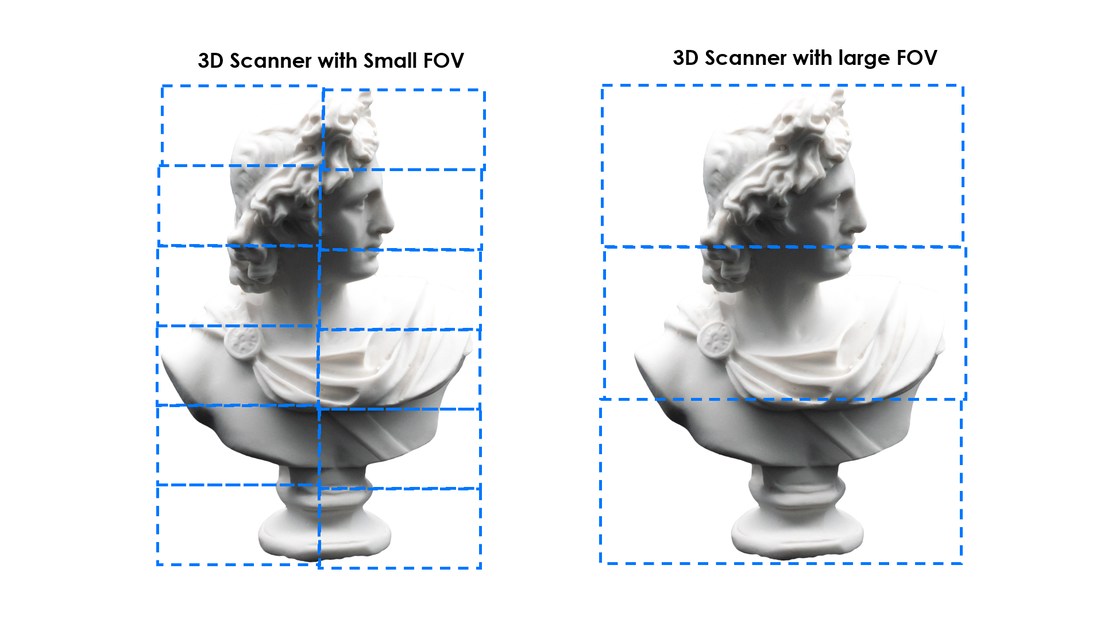 | What happens when you use a 3D scanner with a small FOV to scan large objects? When you scan a large object with a 3D scanner optimized for scanning small objects, you will have to do more scans to reconstruct a complete 3D digital model than you would with a scanner with a large FOV. Look at the theoretical diagram on the left. If you have a large FOV, you only need 3 scans but with a small FOV you need 12 scans. In reality there are overlaps so this is just an illustration. |
|
Now let's see what happens when I use a 3D scanner with a large FOV to scan small objects.
When you are scanning small objects with complex details and texture information, the 3D scanner with a large FOV will not be able to see the fine geometric details. |
Vertical Divider

|
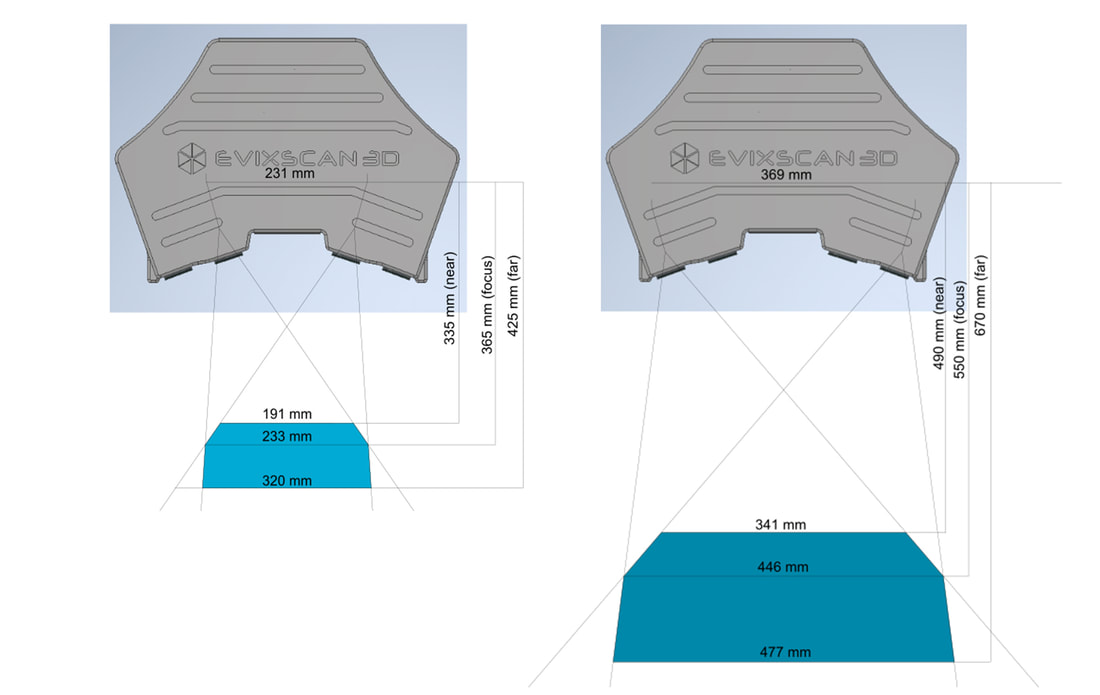
Some scanners have dual FOV like the Transcan C and the eviXscan 3D Quadro+ so it can scan small and medium size objects. On the TranScan C, you can slide the cameras out to increase the FOV, while on eviScan Quadro there are 4 cameras installed - the inner cameras and the outer cameras.

Transcan C
|
Vertical Divider
eviXscan 3D Quadro+
|
It really depends on the simplicity and versatility you require for the project. Naturally, having multiple FOV is a bit more complex due to having varying settings.
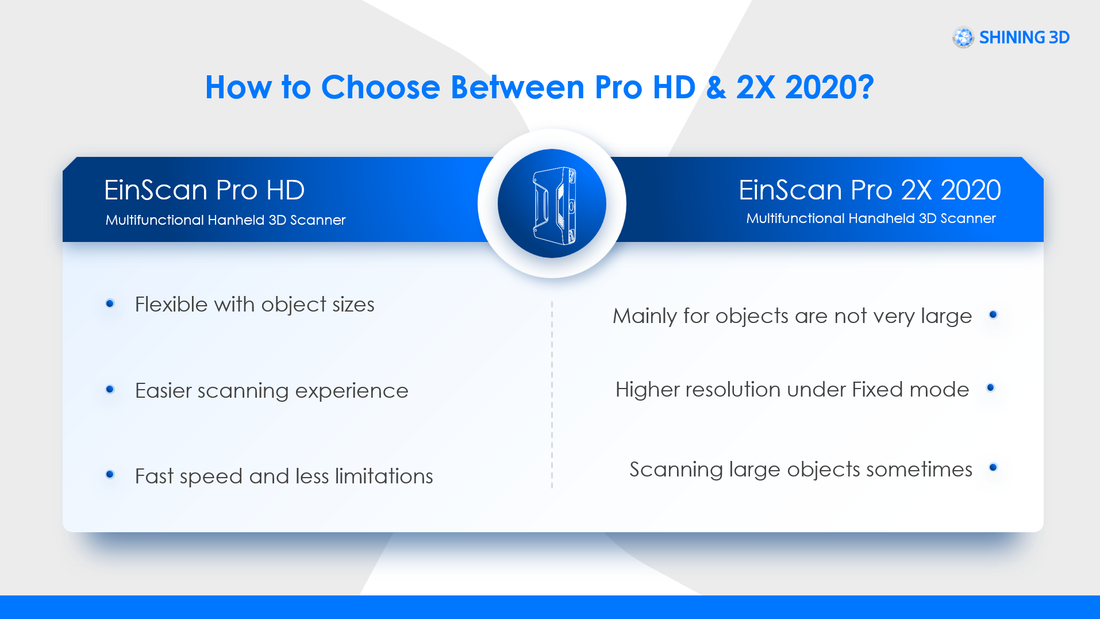
Now let's dig a little deeper and look at the difference in FOV of Einscan Pro HD vs. Einscan Pro 2X 2020.
Now let's dig a little deeper and look at the difference in FOV of Einscan Pro HD vs. Einscan Pro 2X 2020.
Comparing Einscan Pro HD vs EinScan Pro 2X 2020

You can see that these 2 scanners have a different FOV. Guess which one is better suited for large objects? You probably guessed it right if you followed the logic so far - it's the EinScan Pro HD. Objects that are not very large like within the 3-100mm range, EinScan Pro 2X 2020 is better and it's cheaper too!
|
Of course, this is not absolute as there are other factors like whether the texture is reflective or not. If reflective, Pro HD works better unless you can powder coat the object.
|
Vertical Divider
|
So, keep in mind that there is no one-FOV-fits-all 3D scanner if you want a great 3D scanning output. The first step in choosing a 3D scanner is to confirm the size of the object you need to scan so it can help you determine the FOV of the scanner required. In the next blog, we will help you narrow it down further and together we will look at how the material on the surface of the object can affect your purchase choice.
Watch this webinar on how to select a model if you want to learn further!
Watch this webinar on how to select a model if you want to learn further!
Growshapes the official U.S. distributor of Shining 3D EinScan 3D scanners. We now carry the eviXscan 3D scanner from Evatronix as well!
See the innovators on Growshapes’ social media channels to get the latest expert news on innovation in 3D digitization, then share your thoughts and join the conversation about 3D digital innovation with #digitize3D
See the innovators on Growshapes’ social media channels to get the latest expert news on innovation in 3D digitization, then share your thoughts and join the conversation about 3D digital innovation with #digitize3D
0 Comments
In 3D scanning, accuracy is a key metric in choosing which model to use for your project.
How accurately do you need to replicate the physical model? In other words, how authentic do you want the 3D digital model of the real object to be?
High end 3D scanners like eviXscan Quadro+ can achieve up to 0.007mm (7 microns) accuracy, while lower end 3D scanners like EinScan SP can still achieve an accuracy up to 0.05mm (50 microns). Accuracy of a 3D scanner depends on the quality of the camera, projector lights as well as the software.
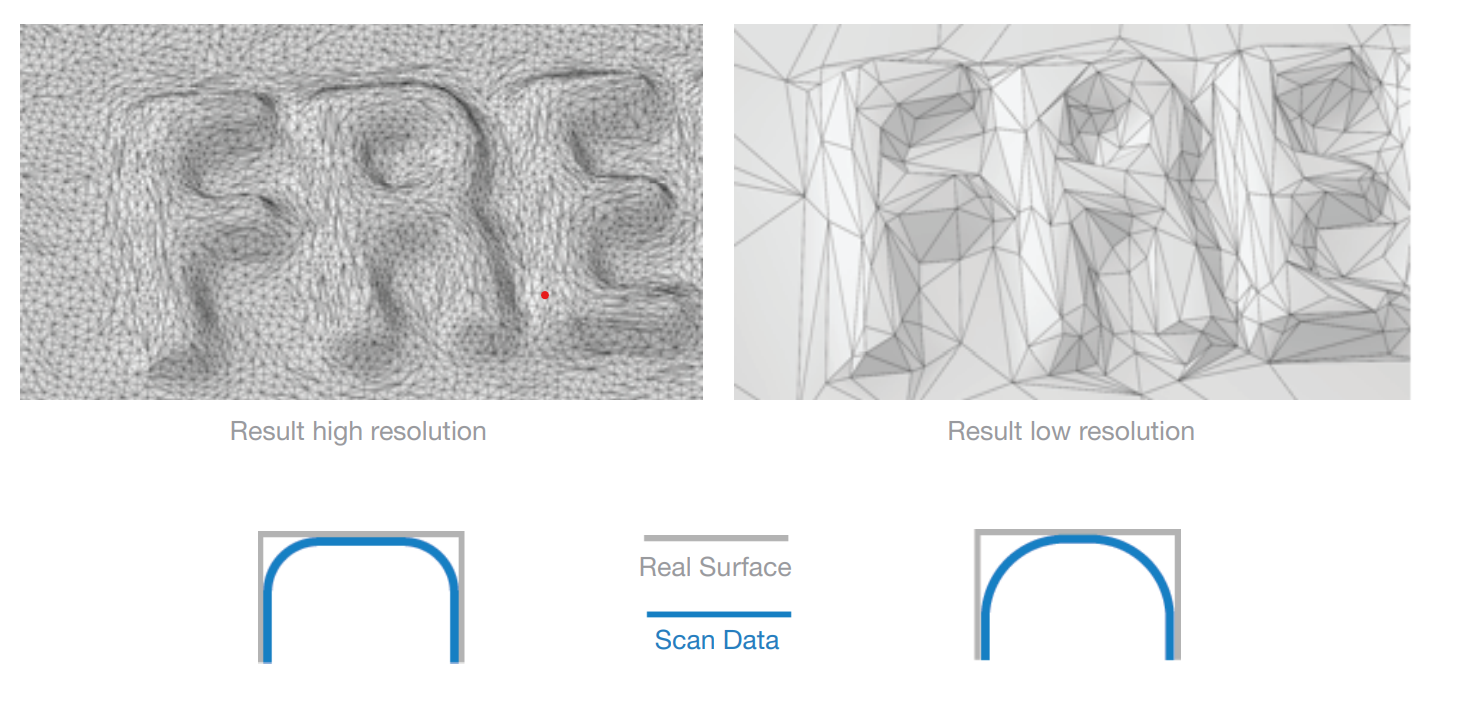
Meanwhile there is another important metric, resolution. Resolution is about defining the point distance the 3D scanner can capture to generate the point cloud which is then converted into a mesh. If you 3D scan your object in high resolution, the point distance is small thus details will be more visible, while if you 3D scan your object in low resolution, the point distance is bigger.
How accurately do you need to replicate the physical model? In other words, how authentic do you want the 3D digital model of the real object to be?
High end 3D scanners like eviXscan Quadro+ can achieve up to 0.007mm (7 microns) accuracy, while lower end 3D scanners like EinScan SP can still achieve an accuracy up to 0.05mm (50 microns). Accuracy of a 3D scanner depends on the quality of the camera, projector lights as well as the software.
Meanwhile there is another important metric, resolution. Resolution is about defining the point distance the 3D scanner can capture to generate the point cloud which is then converted into a mesh. If you 3D scan your object in high resolution, the point distance is small thus details will be more visible, while if you 3D scan your object in low resolution, the point distance is bigger.
| With EinScan 3D scanners, you can set the resolution you want to 3D scan at depending on your target object. Some key things to remember when selecting the correct resolution are below:
| 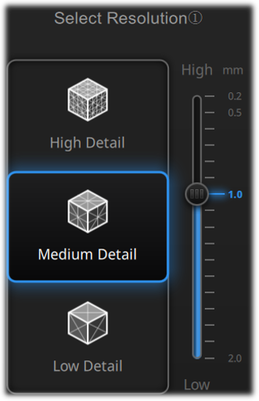 |
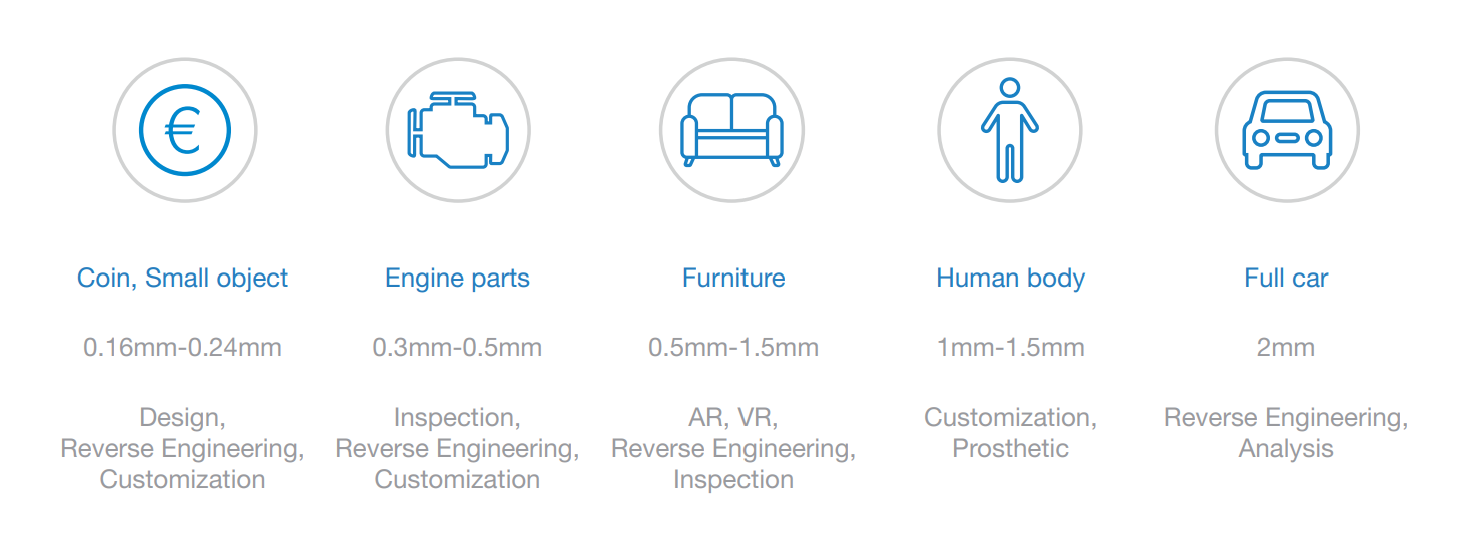
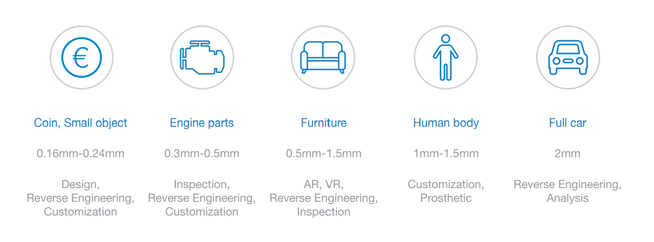
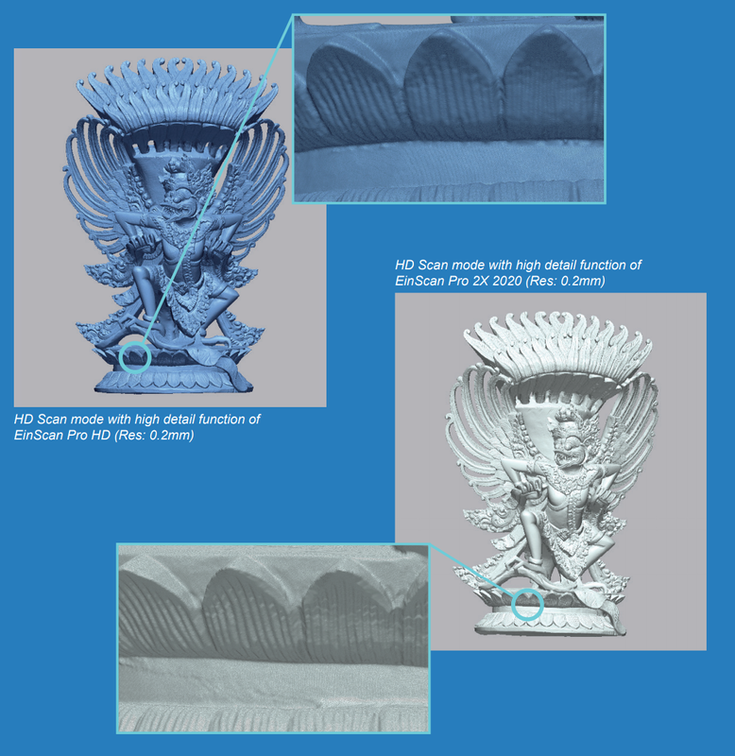
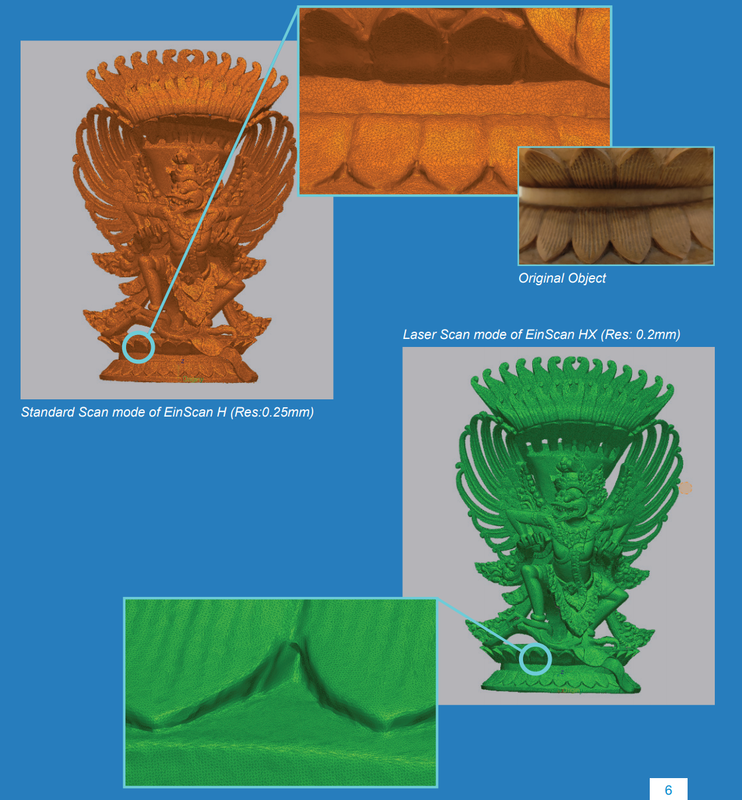
Below is a guideline of resolution settings that is optimal depending on the type of objects you are 3D scanning. Basically the recommendation is the smaller the object, use high detail (higher resolution) and the larger the object, use low detail (lower resolution) settting.
The Einscan Pro HD and EinScan 2X 2020 provde super high resolution with HD scan mode and setting the resolution to "High Detail". This kind of high detail captures is useful for objects with that has a lot of details like the object below. On the other hand, large engineering parts may not require such detail but higher accuracy.

Basically the tip is to think about what you are going to do about your 3D scan file and choose the right resolution setting depending on the object you are 3D scanning.
Growshapes the official U.S. distributor of Shining 3D EinScan 3D scanners. We now carry the eviXscan 3D scanner from Evatronix as well!
See the innovators on Growshapes’ social media channels to get the latest expert news on innovation in 3D digitization, then share your thoughts and join the conversation about 3D digital innovation with #digitize3D
See the innovators on Growshapes’ social media channels to get the latest expert news on innovation in 3D digitization, then share your thoughts and join the conversation about 3D digital innovation with #digitize3D
Challenge: Finding replacement parts for a classic car
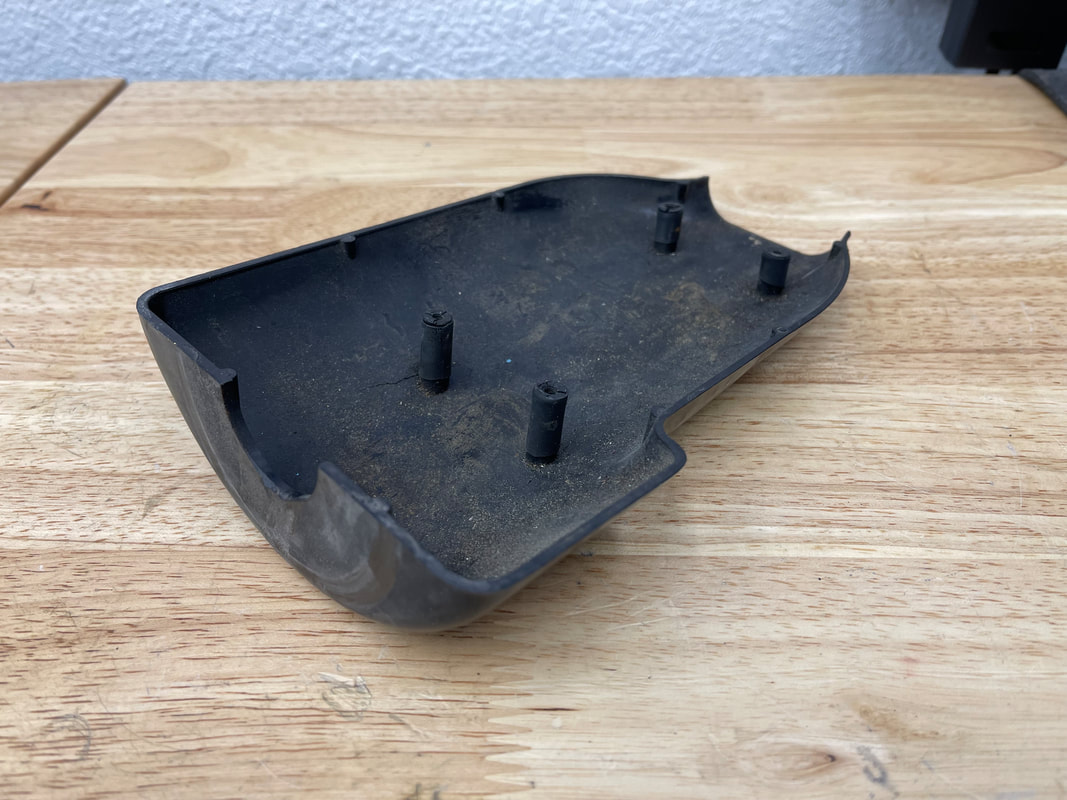
| John Buffington is a classic car enthusiast. He loves restoring cars to their original glory and breathing new life into a classical design. He recently noticed that many of the interior plastic parts of his beloved 1973 Mini Cooper was succumbing to the hot temperatures and high UV exposure of the Nevada desert. One of the critical interior pieces that required immediate replacement was the two steering column covers. The covers were dry, brittle and decaying. They needed to be replaced as they were no longer able to be secured together. However, with a rare classic car like this 1973 Mini Cooper, finding replacement parts in the US is extremely difficult and expensive. |  The 1973 Mini Cooper |
Solution: EinScan Pro 2X fills the gap
John, also being a talented engineer and with his deep knowledge of 3D printing technology, he decided to reverse engineer these Mini Cooper steering column covers and 3D print new replacement parts. Rather than measuring the parts with a caliper and designing in CAD from scratch, John decided to 3D scan the plastic steering column covers to generate a 3D digital surface model to get accurate measurements of the parts with the EinScan Pro 2X 3D scanner
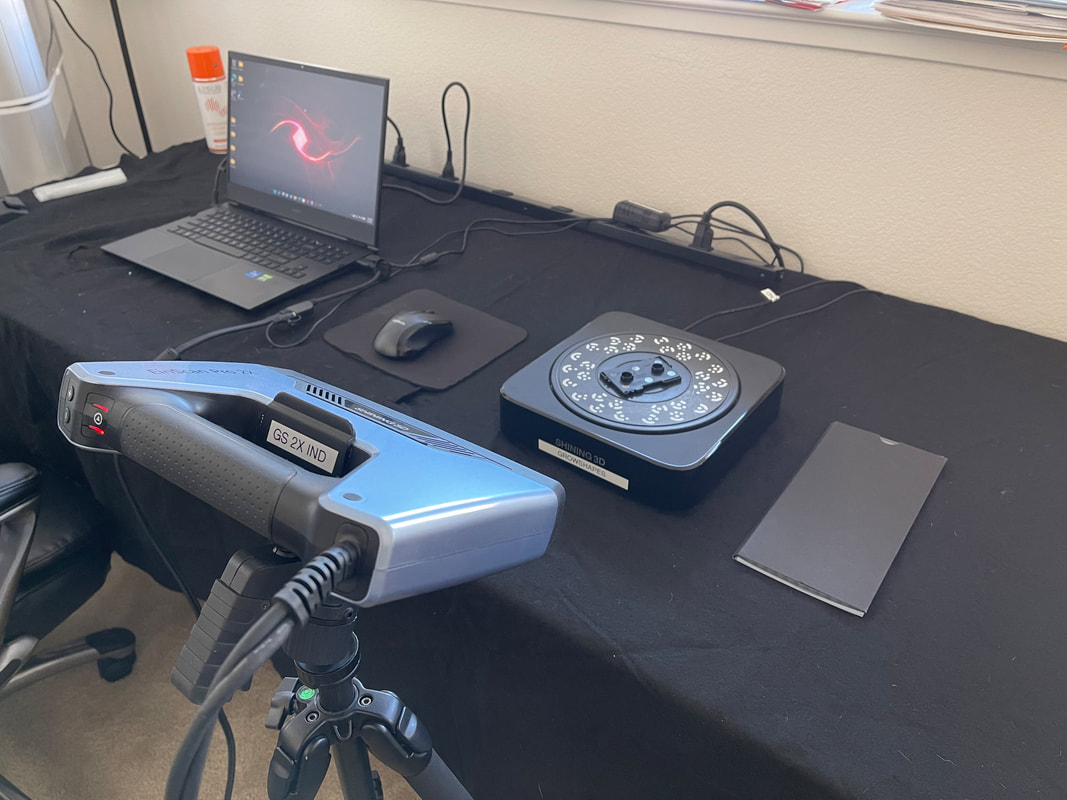
 | He used the EinScan Pro 2X 3D scanner with the Industrial Kit, which is the tripod and automated turntable accessory that enables higher accuracy scanning in fixed mode. When using the Industrial Kit, the handheld 3D scanner is placed on top of the tripod and converted into a desktop 3D scanner and used in conjunction with the automated turntable. This set up automates the whole 3D scanning process as well and enables a more precise alignment utilizing the markers on the turntable. |
| The black steering column plastic parts were covered with AESUB spray to ensure every detail was captured. The AESUB spray lightly coats the object with a thin layer of white powder which evaporates automatically after use without leaving any white residue, making the whole process cleaner. The EinScan Pro 2X captured the dimensions of the object with exceptional precision and accuracy, picking up every minute details, giving John the confidence to reverse engineer the steering column covers. The details of the screw bosses that would have been difficult to measure by calipers were captured by the 3D scanner. The EinScan Pro 3D scanner was simple to use and provided more accuracy than manual measurement. Instead of having to design from scratch, John was able to to create high quality 3D surface mesh files using the 3D scanner. | 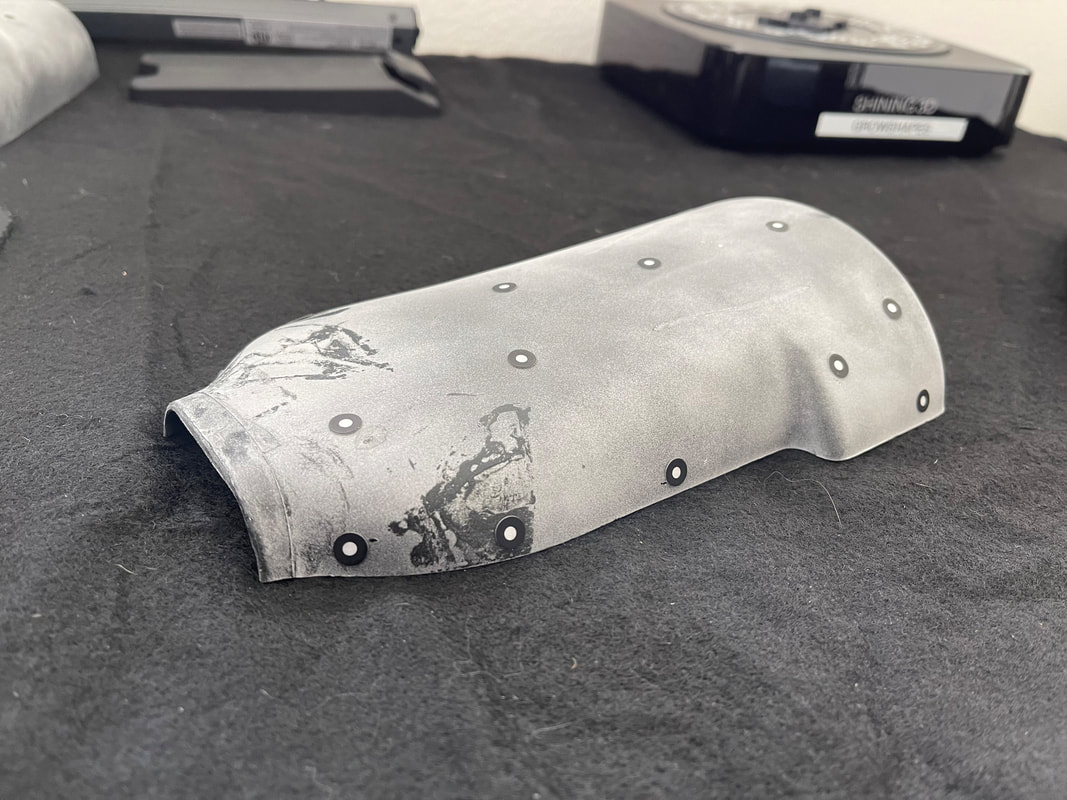 |
The EinScan Pro 2X 3D scanner with the Industrial Kit enabled John to put the object on the turntable and within an hour or so, get a workable 3D mesh. Multiple scans were automatically fused together to create a watertight 360-degree digital surface mesh that was then imported into the Solid Edge Shining 3D Edition reverse engineering software. The surface mesh files were leveraged to build a solid model, make design improvements, and then be further process for 3D printing.
The EinScan Pro 2X 3D scanner with the Industrial Kit enabled John to put the object on the turntable and within an hour or so, get a workable 3D mesh. Multiple scans were automatically fused together to create a watertight 360-degree digital surface mesh that was then imported into the Solid Edge Shining 3D Edition reverse engineering software. The surface mesh files were leveraged to build a solid model, make design improvements, and then be further process for 3D printing.
Results: Capturing details enabled precise CAD file creation for 3D printing
| By using the EinScan Pro 2X, John was able to capture the surface details of the steering column covers as a mesh file (.stl format) which he then imported into the Solid Edge Shining 3D Edition CAD software in which he converted the .stl file into a .step file with precise details of the fastening features, the alignment pins and screw bosses. Time-consuming, inaccurate, and inconsistent manual measurements are now a thing of the past and with 3D digital technology, reverse engineering a classic car part can be fast and accurate. | 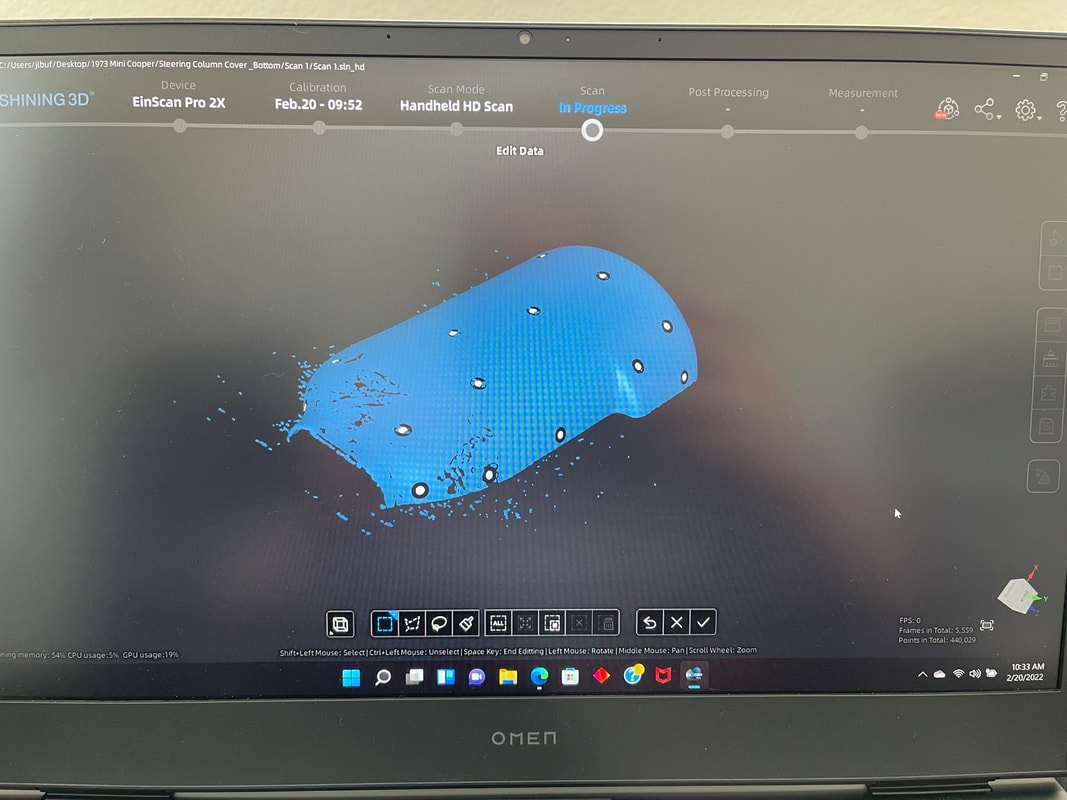 |
“By using the 3D scanner, I was able to focus on creating the CAD file suitable for 3D printing without having to wrestle with measurements and generating a CAD file from scratch.” - John Buffington.
Also importatnt to note is to understand copyright laws in the US. Reverse engineering is legal but if you are going to reproduce and profit, you should get in touch with a patent lawyer. With an old part like above, it's beyond the copyright
Growshapes the official U.S. distributor of Shining 3D EinScan 3D scanners. We now carry the eviXscan 3D scanner from Evatronix as well!
See the innovators on Growshapes’ social media channels to get the latest expert news on innovation in 3D digitization, then share your thoughts and join the conversation about 3D digital innovation with #digitize3D
See the innovators on Growshapes’ social media channels to get the latest expert news on innovation in 3D digitization, then share your thoughts and join the conversation about 3D digital innovation with #digitize3D
We get asked this question a lot. That's why we are here to help. It's not easy to choose a 3D scanner that needs to capture different sizes, surfaces, shapes and textures. It also depends on your budget. The difference in price comes from different components such as the camera lens, projector, light source, and software complexity.
Let's outline 4 important features you need to understand to decide which model would be most suited for your project.
1. Light Source - Structured Light Or Laser?
Let's outline 4 important features you need to understand to decide which model would be most suited for your project.
1. Light Source - Structured Light Or Laser?
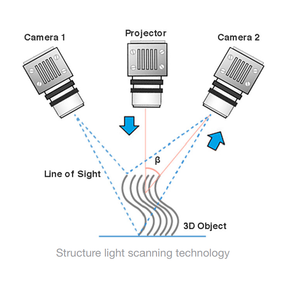 | Structured Light 3D Scanners Structured Light 3D scanners project a light pattterns onto the target object. The changes in the variance in the light patterns are tracked by the cameras and the software algorithm generates point clouds to capture the 3D surface. The structured light pattern projection allows the 3D scanner to captuer a large dimension in seconds in high resolution. Structured light is not hazardous to eyesight. It best performs in an environment where the light condition is stable. There are white light and blue light structured light 3D scanners. Blue light has a narrower wavelength where as white light is a combination of all the colors in the visible spectrum. The narrow wavelength enables better filtering of the interference of ambient light thus offers better precision, accuracy and higher quality outputs. |
| Laser 3D Scanners Laser scanner projects a laser point or beams onto the target object and the reflection of the laser light is captured with the sensors. Laser light is less sensitive to environmental light and performs better in capturing shiny or dark surfaces. However, very shiny or transparent surfaces are still difficult to capture by laser light. | 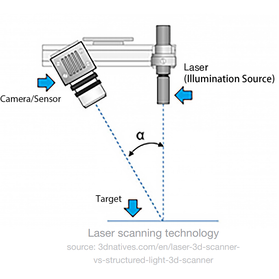 |
2. Accuracy and Resolution
Accuracy
The accuracy gives an information about the authenticity of a 3D model to the real object. Knowing the accuracy of your scanner is very important because it determines which model is most suitable for quality inspection, reverse engineering design, medical health, or any other applications with very rigid accuracy requirements. Usually, the higher accuracy the scanner is able to generate, the more applications it could be suitable for, and of course, the higher the cost.
Remember though, not all 3D scanning projects require the highest accuracy, so consider your budget and requirements to make a decision on which model to purchase. The accuracy used in the specifications of the scanner usually refer to the accuracy of a single scan. The volumetric accuracy refers to the relationship between 3D data accuracy and object size; with EinScan Pro Series the accuracy is reduced by 0.3mm per meter. This data is based on measuring the center of sphere with marker alignment. The volumetric accuracy of EinScan HX in laser mode is 0.06 mm per meter.
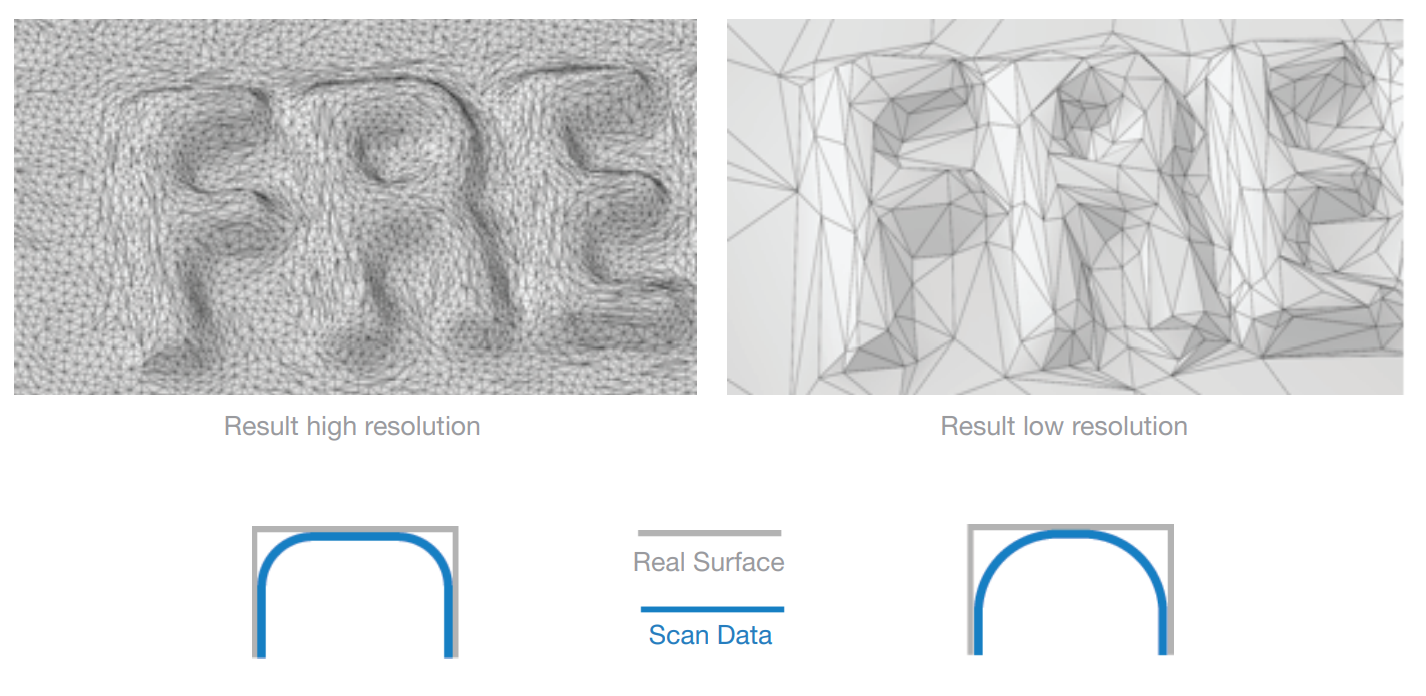 | Resolution Resolution defines the point distance of the points within the point cloud the 3D scanner is capturing. The distance between two points in a 3D model is one of the most important factors for your scan. When you take a high resolution, the point distance is very small, and details are better to see on the scan. If you capture in low resolution, the point distance is big and big objects can be captured faster and the 3D scan data file size will be smaller. |
With EinScan handheld 3D Scanners the Pro Series and the H series, the resolution can be changed depending on the object size to ensure the 3D scan data size is manageable.
3. Scan Speed
Scan speed is a specification that definese how long it takes to scan one given object. It especially matters when you are going to scan the human body, as people can not stay still for a long time, and it also helps to improve the work efficiency when you are 3D scanning large objects like cars, buildings, etc. Scan speed can be defined by the number of points collected per second, frames per second, or how many seconds it takes to do a single scan. The more points or frames collected per second, the faster the scan speed.
4. Desktop or Handheld
Desktop 3D scanners are provides higher accuracy and enables automation of the whole 3D scan process. The EinScan Pro series handheld 3D scanners can be turned into a desktop/fixed 3D scanners with the Industrial Kit. For 3D scanning larger objects (like humans or cars), using the handheld 3D scanner is the only solution.
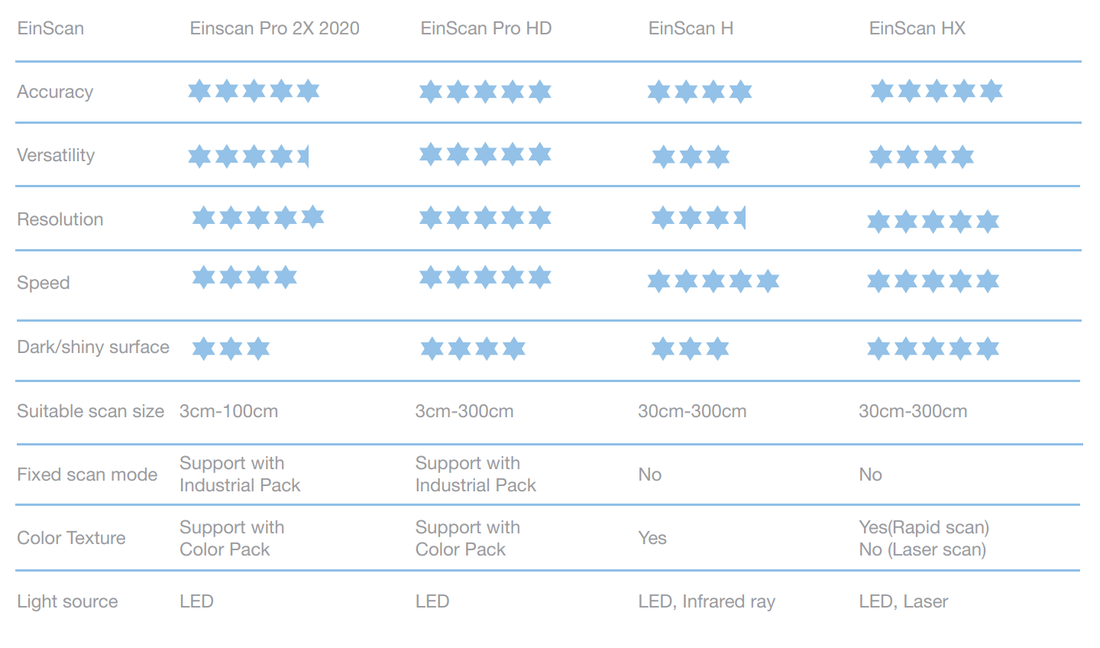
So which model shall I buy?
- For smaller objects, definitely the EinScan Pro 2X 2020 (white structured light) to achieve high resolution and high quality 3D modeling and design.
- For mid-large size objects and with higher accuracy and resolution either the EinScan Pro HD (white structured light) or the EinScan HX (laser & blue light).
- If you want versatility and also want to automate the 3D scanning workflow, go for the EinScan Pro HD with Industrial Kit. The new projection hardware and software algorithm allows the EinScan Pro HD to scan dark and casting metal surfaces.
- If you have very shiny or dark surfaces, go for the EinScan HX. The laser scanning mode guarantees outstanding accuracy and resolution.
- If you want to capture people or furniture with color texture, EinScan H (infrared & white light) is the way to go. It captures hair and also has a special body scan mode which facilitates data acquisition despite slight movements.
Here is a comparison at a glance.
Accuracy Comparison
In reality all of the above models have similar accuracies.
EinScan Pro HD and EinScan Pro 2X 2020 both have the same accuracy of 0.045mm in Handheld HD mode, while it is 0.05mm for EinScan H in body and standard mode, and 0.04mm for EinScan HX in laser mode. So accuracy might not be a critical parameter for you to choose a proper device among EinScan series. If high accuracy is a top priority on your agenda, EinScan HX is the best choice among all EinScan scanners.
Resolution Comparison
EinScan Pro Series (2X 2020 & HD) achieves a higher resolution compared to EinScan H series. Resolution captured by EinScan Pro 2X 2020 is marginally higher than the Pro HD due to the single scan range being smaller.
EinScan Pro Series (2X 2020 & HD) achieves a higher resolution compared to EinScan H series. Resolution captured by EinScan Pro 2X 2020 is marginally higher than the Pro HD due to the single scan range being smaller.
The EinScan H series have a different projecting pattern to the Pro Series thus the resolution is lower. But remember, the EinScan HX can achieve a higher accuracy vs. the Pro Series.
Scan Speed Comparison
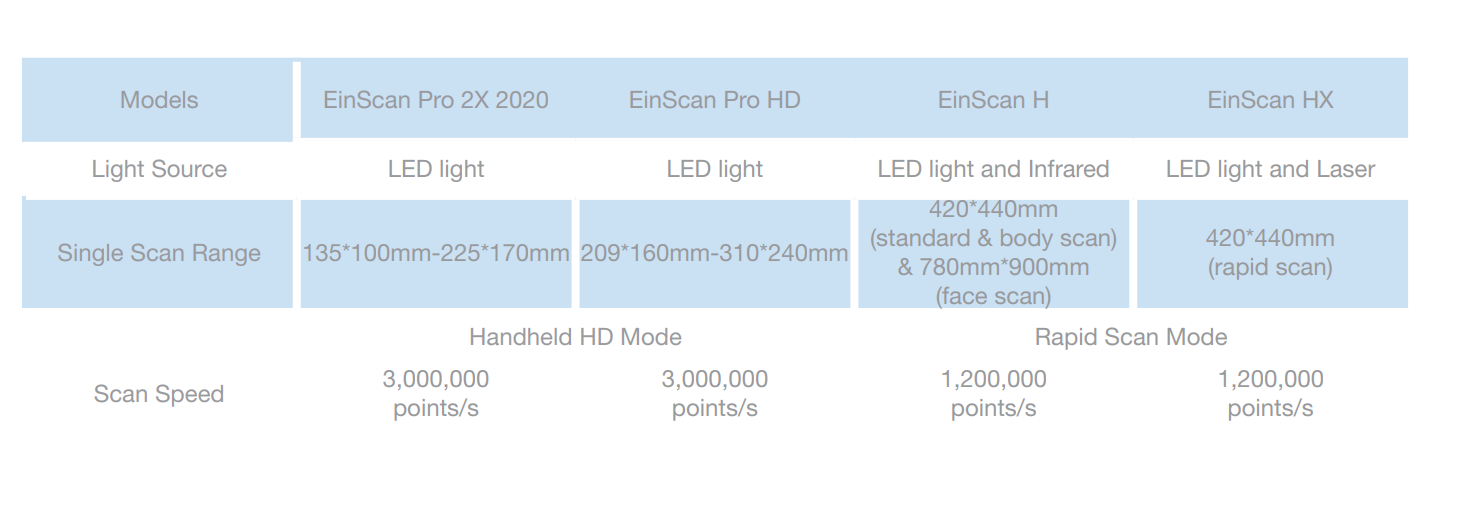
To compare the speed of scanners, two facts need to be considered: single scan range and the points captured per second.
For points captured per second, in Handheld Rapid mode, all scanners of the EinScan Pro Series come with the same speed of 1,500,000 points/s. However as the EinScan Pro HD has a larger single scan range, it can scan large objects at a faster speed. EinScan H (standard scan&body scan) and EinScan-HX (rapid scan) come with the same scan speed in terms of points captured per second and scan range, which are all faster than Pro series. In the face scan mode of EinScan-H, the maximum scan range could reach 780mmx 900mm enabling a fast scan.
For points captured per second, in Handheld Rapid mode, all scanners of the EinScan Pro Series come with the same speed of 1,500,000 points/s. However as the EinScan Pro HD has a larger single scan range, it can scan large objects at a faster speed. EinScan H (standard scan&body scan) and EinScan-HX (rapid scan) come with the same scan speed in terms of points captured per second and scan range, which are all faster than Pro series. In the face scan mode of EinScan-H, the maximum scan range could reach 780mmx 900mm enabling a fast scan.
Hope this answers many of the questions you may have had!
Growshapes is an HP Silver Partner of HP 3D scanning solutions and the official U.S. distributor of Shining 3D EinScan 3D scanners. We are now carry the eviXscan 3D scanner from Evatronix as well!
See the innovators on Growshapes’ social media channels to get the latest expert news on innovation in 3D digitization, then share your thoughts and join the conversation about 3D digital innovation with #digitize3D.
See the innovators on Growshapes’ social media channels to get the latest expert news on innovation in 3D digitization, then share your thoughts and join the conversation about 3D digital innovation with #digitize3D.
eviXscan 3D FinePrecision is an optical measuring device operating with blue LED light source. The scanner equipped with two fast 8.9 Mpix cameras of the latest generation with CMOS matrices is characterized by high accuracy of reproduction of even the smallest elements of precision mechanics. FinePrecision technology enables to achieve an accurate measurement of the dimensions of the scanned object (accuracy better than 6 µm, repeatability less than 3 µm). The detail of the scans obtained results from high density of recorded points (more than 1200 points per square millimeter of the scanned surface). A single scan can collect measurement data from a volume of 120 mm x 60 mm x 45 mm.
The advantage of the eviXscan 3D FinePrecision scanner is the short scanning time. The combination of high-speed cameras and the modern DLP light projection system, whose signal triggers the cameras every time a new pattern is displayed, reduces the scan acquisition time to several hundred milliseconds.
FinePrecision scans with high level of detail which is crucial when measuring elements of precision mechanics (micro rotors, small plastic elements made by injection molding, objects manufactured on CNC machines or by 3D printing). The scanner allows also precise 3D scanning of sharp-edged tools or components. FinePrecision can also be used in the scanning of implants, in prosthetics as well as in jewelry manufacturing and watchmaking industry. Its precision enables its use in the optimization of the 3D printing process.
– Based on experience with our Heavy Duty scanners and discussions with our customers indicating areas where precise measurement and very detailed surface mapping was needed, we defined the requirements for a scanner that is a solution for these unfulfilled needs – said Kamil Góra, Product Manager of 3D Scanners in Evatronix. – According to these requirements our R&D department developed a product ready to meet everyday challenges of metrology labs with measurement of fine mechanics objects. Using cameras and projector optimized specifically for our scanner, allowed us to offer a product adjusted to the needs of its future users, really a scanner “from engineers for engineers”.
eviXscan 3D FinePrecision can also be used in the field of predictive maintenance. The identification of microdamage to key components of production equipment (e.g. turbine blades) helps to prevent potential failures, which in turn reduces costs of downtimes.
Fine Precision scanner is available for demonstration and ordering now with first deliveries planned for the second half of March 2021.
Read more details and request a quote for the eviXscan 3D FinePrecision scanner from here.
Growshapes is an HP Silver Partner of HP 3D scanning solutions and the official U.S. distributor of Shining 3D EinScan 3D scanners. We are now carry the eviXscan 3D scanner from Evatronix as well!
See the innovators on Growshapes’ social media channels to get the latest expert news on innovation in 3D digitization, then share your thoughts and join the conversation about 3D digital innovation with #digitize3D.
See the innovators on Growshapes’ social media channels to get the latest expert news on innovation in 3D digitization, then share your thoughts and join the conversation about 3D digital innovation with #digitize3D.
Evatronix, the industrial-grade 3D scanner manufacturer, is shipping two new 3D scanner models early March 2020 to the USA! Announced at Formnext 2019, these 2 new scanners utilize the advanced eviXscan 3D scanning software that comes with Heavy Duty Optima and Heavy Duty Quadro, while it is optimized to scan larger objects and smaller objects with high precision.
Both the Wide Range 3D scanner and the Fine Precision 3D scanners use blue LED as a light source and comes equipped with two 12 megapixel cameras. See more details in the below leaflets.
| | |
Growshapes is an HP Silver Partner of HP 3D scanning solutions and the official U.S. distributor of Shining 3D EinScan 3D scanners. We are now carrying the eviXscan 3D scanner from Evatronix too!
See the innovators on Growshapes’ social media channels to get the latest expert news on innovation in 3D digitization, then share your thoughts and join the conversation about 3D digital innovation with #digitize3D.
See the innovators on Growshapes’ social media channels to get the latest expert news on innovation in 3D digitization, then share your thoughts and join the conversation about 3D digital innovation with #digitize3D.
Growshapes had a great 2018 and have been busy to make sure we offer the best customer experience when somebody is looking to buy 3D scanners or adopt 3D scanning technology into their workflow.
Highlight of 2018
But the year isn't over yet!
If you want to add 3D scanning to your workflow, check out the 3D scanner selection on www.growshapes.com.
Highlight of 2018
- Expanded our product portfolio beyond HP 3D scanners and added Open Technologies (now FARO) industrial grade 3D scanners as well as Shining3D EinScan handheld 3D scanners
- Became a referral agent to Artec 3D scanners
- Partnered with "medifacturing" startup, PrinterPrezz, to extend reach into the medical industry with 3D scanning technology
But the year isn't over yet!
If you want to add 3D scanning to your workflow, check out the 3D scanner selection on www.growshapes.com.

Growshapes likes 3D-scanning stuff (naturally!) to see how digitization impacts industry and people.
This month we 3D-scanned a beautiful Bizen-ware bird, created by Japanese ceramic artist Yukiko Akai, who lives in Okayama Prefecture, Japan. Yukiko uses an 800-year-old kiln firing method for ceramics, which originated on the Korean peninsula and migrated to the town of Bizen, Japan, eventually evolving into Bizen-ware. Bizen-ware is a durable ceramic with a distinct gloss created from a chemical reaction of clay, fire, and firewood ash, rather than from glazing. Even without glazing, the ceramic is watertight.
Because of Bizen-ware uses all-natural materials and processes, Yukiko also participates in the excavation of medieval kilns to research historical kiln structures, document findings, and educate others. Such research aims to not only uncover the past, but also enable exploration of new artistic expressions.
This summer, Yukiko and her Master (teacher) undertook a project in Arkansas to recreate the Bizen-ware process there, using the clay and local materials of Arkansas. You can read more about the project here.
When Growshapes encountered her work, the first thing we thought was, “Let’s digitize!”
So here it is. A piece from Yukiko's signature "Bird" series in its digital glory.
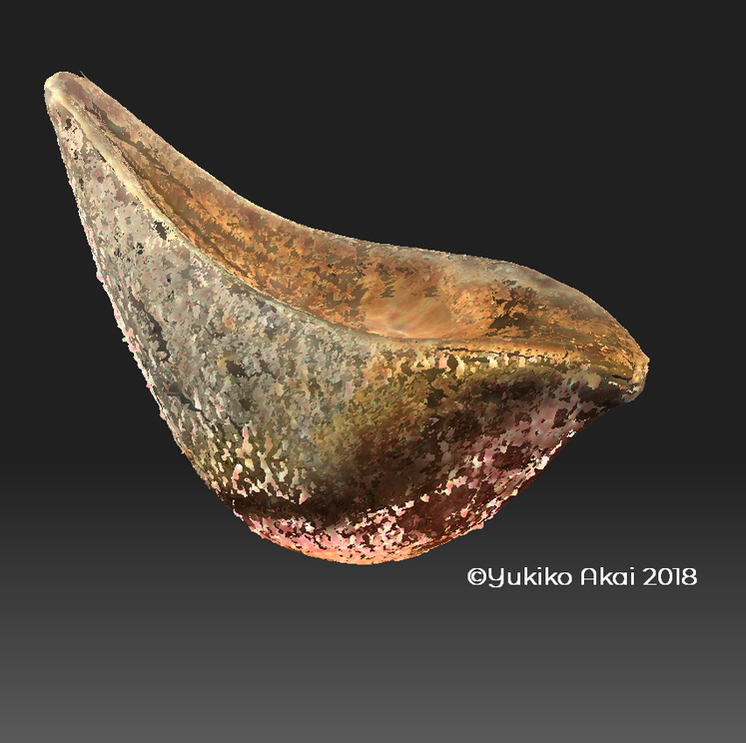 Scan files with texture | 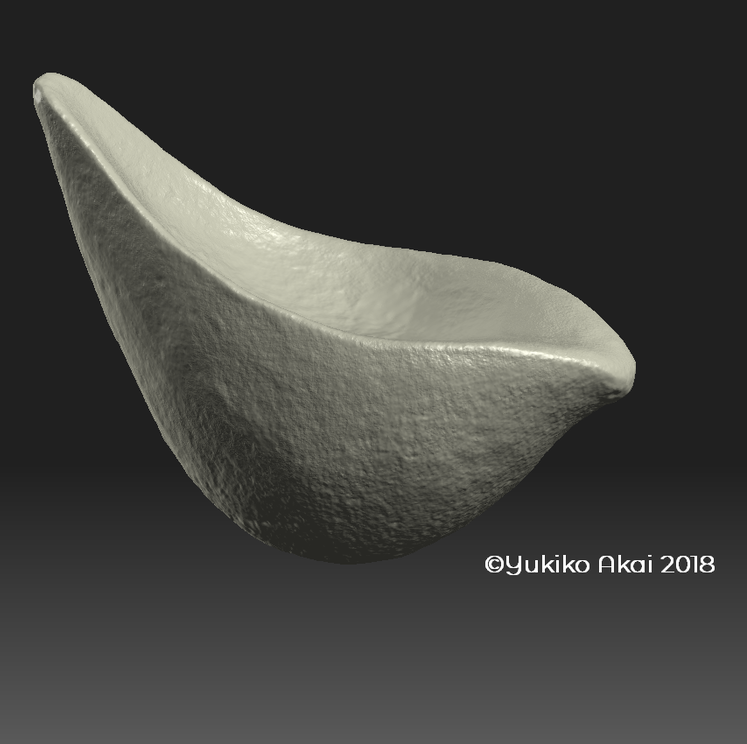 Fused file without texture |
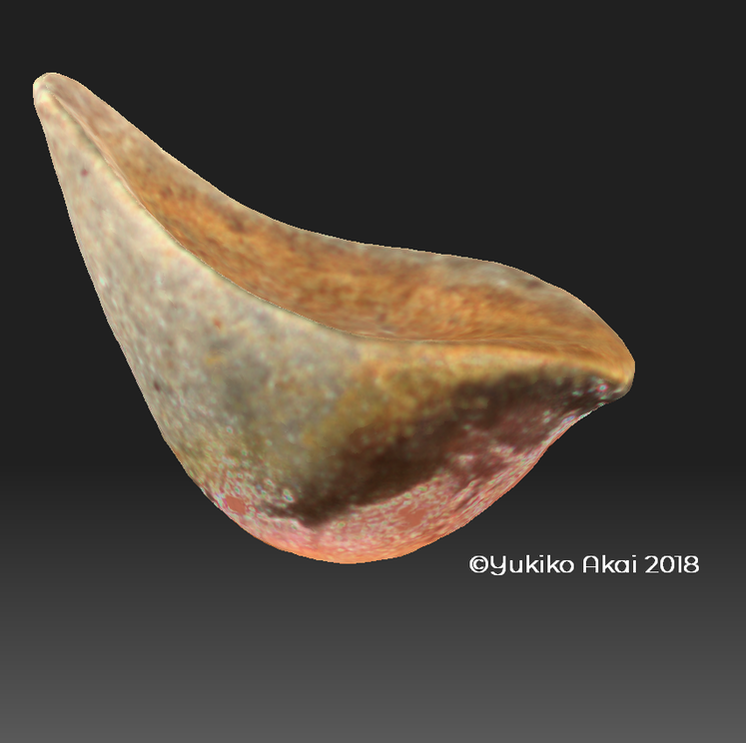 Fused file with texture |  Photo of the actual Bizen-ware "Bird" |
This piece was a bit tricky to 3D scan due to its dark color, gloss and the concave shape on the top. The key was to place the object in the right position, 3D scan from several angles so that the light would cast on all angles of the object.
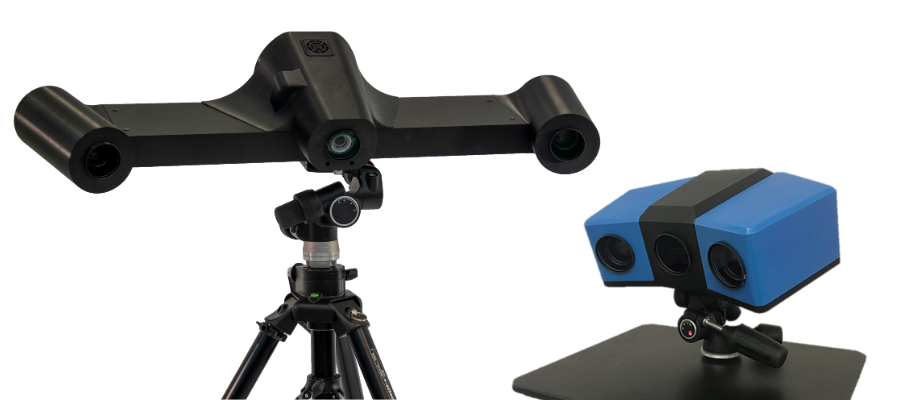
The "Bird" has been scanned using the HP 3D Structured Light Pro S3 with dual camera, with the scanner set up on the desk scan lever, and the object placed on the automated turntable.
Click to buy the HP 3D Structured Lights Scanner Pro S3 with Dual Camera Bundle.
The whole scanning process took less than 2 hours from set up to file clean up. Organic shapes, especially symmetrical ones, tend to be difficult to align in 3D scanning. But the HP 3D scanner alignment features really excelled once again!
"Now I actually understand how digitization of traditional physical objects can be achieved. To see my actual creation in digital form is quite exciting! " said Yukiko upon seeing the digital 3D scan files.
|

Yukiko Akai, Bizen-ware artist
|
 | Yukiko’s “Bird” series is something she has created since 2012. Having grown up surrounded by nature, Yukiko wanted to express beautiful organic shapes through ceramics. During the Bon Festival when Yukiko was honoring her grandfather’s spirit, a beautiful bird landed in her garden and befriended her. That was when she decided to create the “Bird”. The series have further evolved to have a more streamlined form after visiting the U.S. and seeing a bird soar in the sky. She felt the wind as she watched the bird fly away and wanted to express it. How beautiful! |
Growshapes is an HP Silver Partner of HP 3D scanning solutions and the official U.S. distributor of Open Technologies 3D Scanners - an endorsement that makes us proud.
See the innovators on Growshapes’ social media channels to get the latest expert news on innovation in 3D digitization, then share your thoughts and join the conversation about 3D digital innovation with #digitize3D
See the innovators on Growshapes’ social media channels to get the latest expert news on innovation in 3D digitization, then share your thoughts and join the conversation about 3D digital innovation with #digitize3D
Many of our customers are scanning very small objects or large objects. The great thing is the HP Pro S3 3D scanner is quite flexible and offers calibration panels that you can print out.
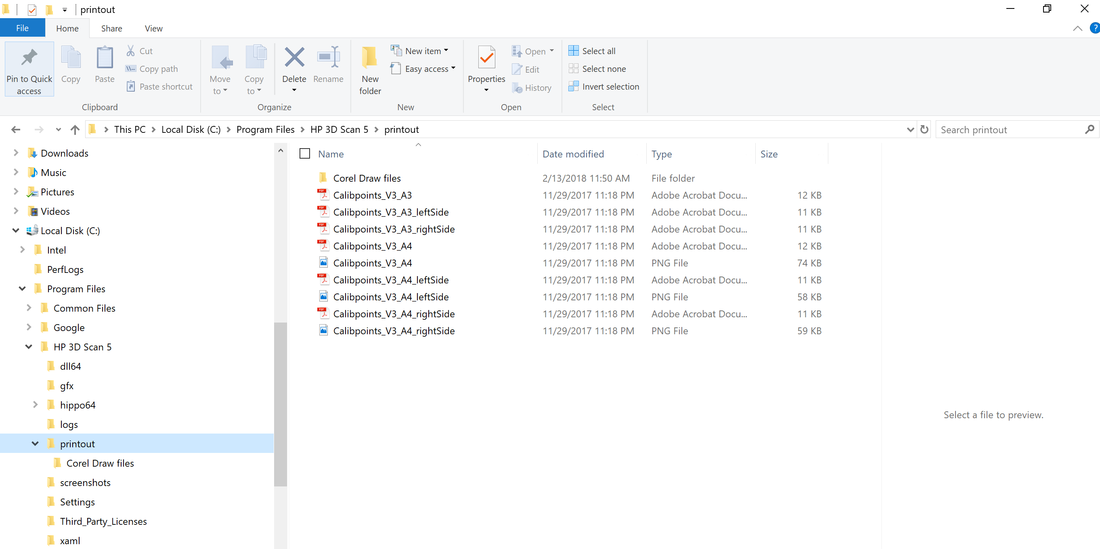
The calibration point pattern files come with the HP 3D Scan 5 software. After you have installed the software on your PC, the calibration point patterns is stored under Program Files.
You will find it per below. "Program Files on your PC > HP 3D Scan 5 > printout"
The calibration point pattern files come with the HP 3D Scan 5 software. After you have installed the software on your PC, the calibration point patterns is stored under Program Files.
You will find it per below. "Program Files on your PC > HP 3D Scan 5 > printout"
The key is to create a 90° corner with the right side and left side panels and ensure the panels are flat to enable successful calibration with your custom calibration panel.
Our FREE TURNTABLE (worth $1,199) FOR EVERY HP 3D SCANNER PRO S3 PURCHASE campaign is ending soon, so if you are contemplating buying the HP Pro S3 3D scanner, now is the time!
Growshapes is an HP Silver Partner of HP 3D scanning solutions and the official U.S. distributor of Open Technologies 3D Scanners - an endorsement that makes us proud.
See the innovators on Growshapes’ social media channels to get the latest expert news on innovation in 3D digitization, then share your thoughts and join the conversation about 3D digital innovation with #digitize3D
See the innovators on Growshapes’ social media channels to get the latest expert news on innovation in 3D digitization, then share your thoughts and join the conversation about 3D digital innovation with #digitize3D
Yes, you can even 3D scan a walnut.
All you need to do is to calibrate the HP 3D scanner Pro S3 using the smallest calibration scale, 30mm, on the calibration panel.
A walnut has various protrusions and as result, creates lots of shadows when casting the projector light onto it. So we propped up the walnut on a black foam to ensure the projector light could penetrate the walnut as much as possible.
We used black foam that comes inside pelican briefcases. One of our customers taught us this trick and it really works well as the 3D scanner only captures some bits of the foam due to its dark color. The bits captured can be easily deleted in the editing phase.
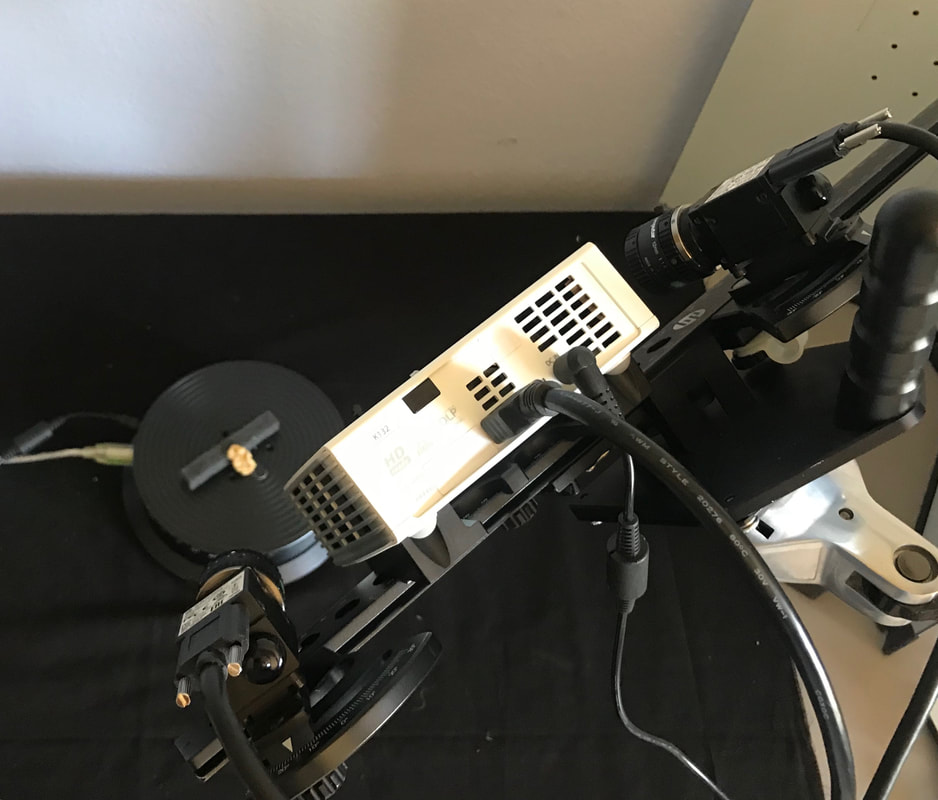
Figure 1: Setup
Below is the combination of the 3D scan files, all 47 different scans as we tried to capture the undercut as much as possible. The 3D scans still have have holes as was really difficult to penetrate the projector light into every undercut of the walnut. Furthermore, the difficulty was aligning the front and the back of the walnut as the side profile was pretty difficult to capture.
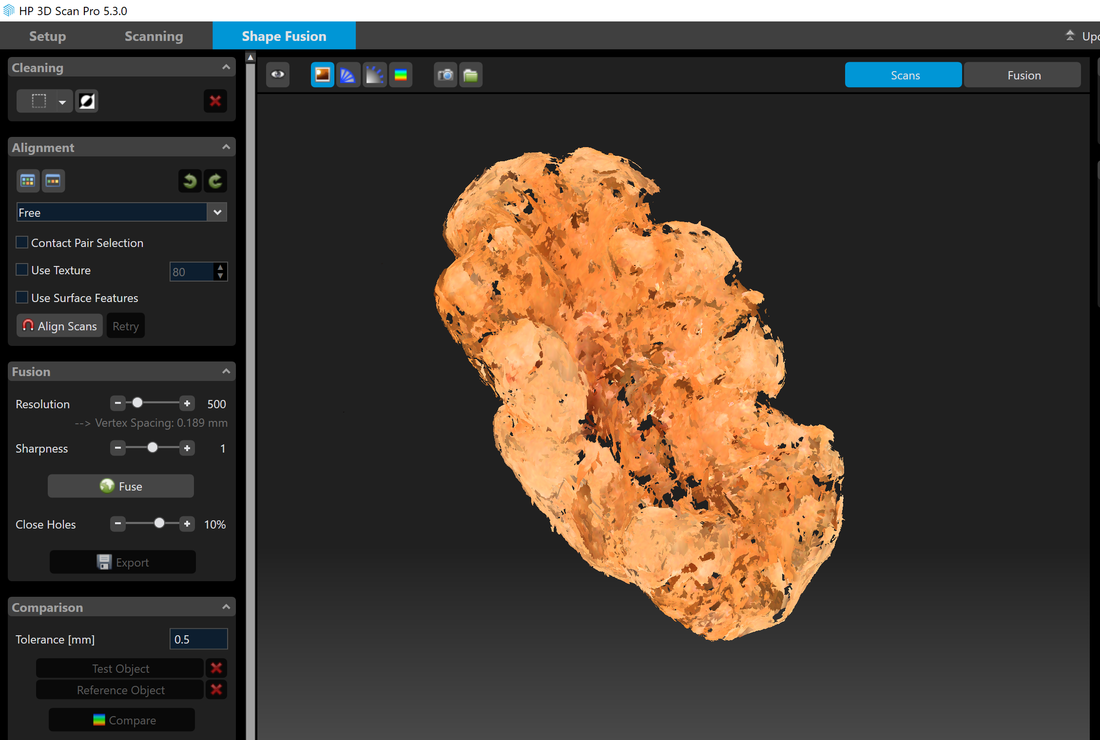
Figure 2: 3D scan results
And here is the fusion results after the HP 3D Scan software automatically closed all the holes to create a watertight model.
And now we know that the walnut is 1,314 mm³ or 0.08 in³!
And now we know that the walnut is 1,314 mm³ or 0.08 in³!
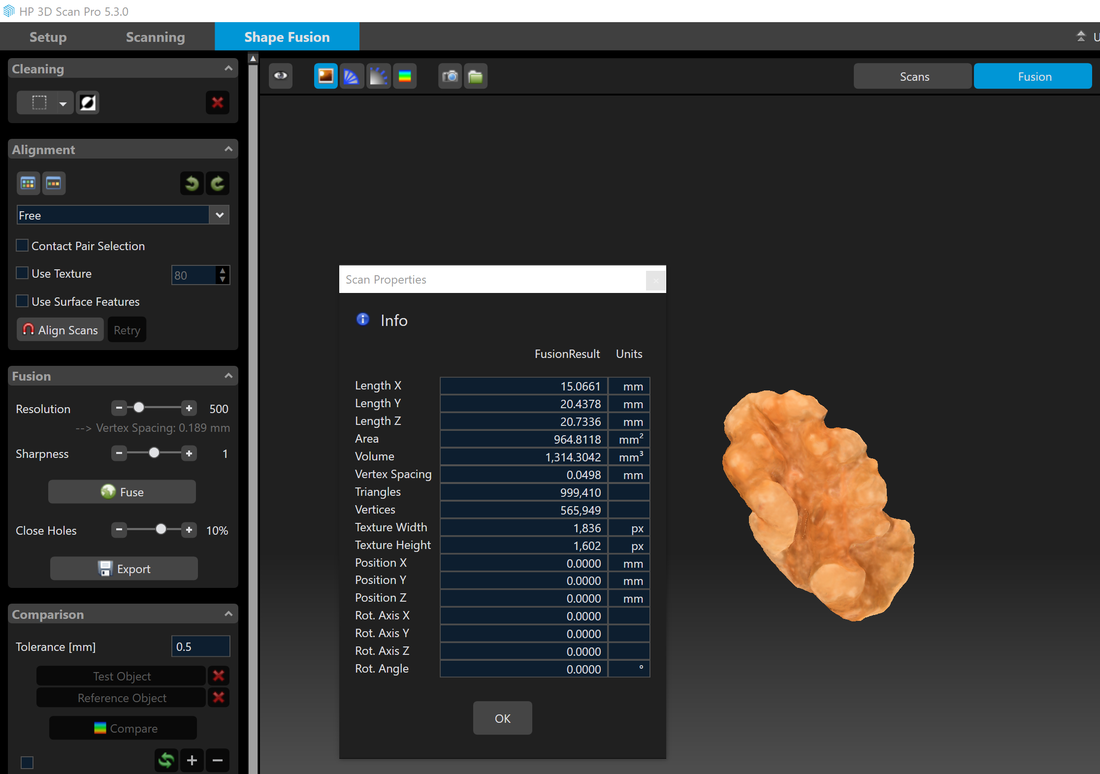
Figure 3: Fusion Results
We just wanted to show you with this blog that you can 3D scan even a walnut!
Our FREE TURNTABLE (worth $1,199) FOR EVERY HP 3D SCANNER PRO S3 PURCHASE campaign is ending soon, so if you are contemplating buying the HP Pro S3 3D scanner, now is the time!
Our FREE TURNTABLE (worth $1,199) FOR EVERY HP 3D SCANNER PRO S3 PURCHASE campaign is ending soon, so if you are contemplating buying the HP Pro S3 3D scanner, now is the time!
Growshapes is an HP Silver Partner of HP 3D scanning solutions and the official U.S. distributor of Open Technologies 3D Scanners - an endorsement that makes us proud.
See the innovators on Growshapes’ social media channels to get the latest expert news on innovation in 3D digitization, then share your thoughts and join the conversation about 3D digital innovation with #digitize3D
See the innovators on Growshapes’ social media channels to get the latest expert news on innovation in 3D digitization, then share your thoughts and join the conversation about 3D digital innovation with #digitize3D
Growshapes
Provider of leading edge 3D scanning products and services. We see 3D!
Archives
July 2024
June 2024
May 2024
March 2024
December 2023
October 2023
June 2023
April 2023
February 2023
October 2022
September 2022
August 2022
May 2022
April 2022
March 2022
February 2022
November 2021
October 2021
August 2021
April 2021
March 2021
January 2021
December 2020
November 2020
September 2020
August 2020
June 2020
April 2020
March 2020
January 2020
December 2019
November 2019
October 2019
June 2019
May 2019
January 2019
December 2018
November 2018
October 2018
September 2018
August 2018
July 2018
June 2018
May 2018
April 2018
March 2018
February 2018
January 2018
December 2017
November 2017
October 2017
September 2017
August 2017
July 2017
April 2017
February 2017
January 2017
December 2016
November 2016
October 2016
July 2016
June 2016
May 2016
April 2016
January 2016
December 2015
November 2015
October 2015
September 2015
July 2015
June 2015
April 2015
March 2015
January 2015
December 2014
November 2014
October 2014
September 2014
August 2014
July 2014
June 2014
May 2014
April 2014
March 2014
February 2014
January 2014
Categories
All
3D Printing
3D Scan File Ouput
3D Scanner Rental
3D Scanner Setup
3D Scanning
3D Scanning Colorful Objects
3D Scanning Dark Surfaces
3D Scanning Faces
3D Scanning Highly Details Objects
3D Scanning Humans
3D Scanning Large Objects
3D Scanning Shiny Surfaces
3D Scanning Small Objects
3D Visualization
Additive Manufacturing
Afinia
Alignment In 3D Scanning
Augumented Reality (AR)
Blue Laser
Blue Light
DAVID 3D Scanners
Design
Desktop 3D Printers
Ecology/Sustainable
Education
EFoil Wing
EinScan 3D Scanners
EinScan 3D Scanner Software
Einscan H
EinScan H2
EinScan HX
EinScan Pro 2X
EinScan Pro 2X 2020
EinScan Pro 2X Plus
EinScan Pro HD
EinScan SE/SP
Einstar
Engineering
Evatronix EviXscan
Field Of View
FormLabs
Geomagic
HP Structured Light Scanner Pro S3
Industrial Kit
Infrared
Laser 3D Scanning
MacOS
Makerbot
Makerspace
Market SIze
Mcor IRIS 3D Printer
Medical
Mesh Optimization
Netfabb Software
Open Technologies Cronos 3D Scanner
Orthotics And Prosthetics
Product Developers
Prototyping
Reverse Engineering
Shining3D
Software Updates
Solid Edge Software
Structured Light 3D Scanning
Transcan C
White Light
Workforce Development
 RSS Feed
|
Vertical Divider
GROWSHAPESStay connected |
Menu |


|
©2024 Growshapes LLC. All rights reserved.