LET'S TALK ABOUT 3D SCANNING |

|
DAVID 5 software has been designed to overcome the challenges of 3D scanning glossy and reflective surfaces with its brand new and patented Structured Light patterns! No matter whether you are using one or two cameras, DAVID 5 will project our new stripe pattern sequence on the object. This new structure light strip pattern is more robust against reflections, so the big advantage is that glossy/reflective surfaces can be scanned much better. Of course we still can't do magic, so e.g. glass, mirrors or other very shiny surfaces will still be difficult to scan, so you will need to keep using a white coating spray like a Magnaflux Developer Spray or actually a foot spray will do too. But even without spray, especially metal can be scanned much better, as the below example demonstrates. See how much the scan is improved with DAVID5 software. Test Scene - notice the strong reflections! 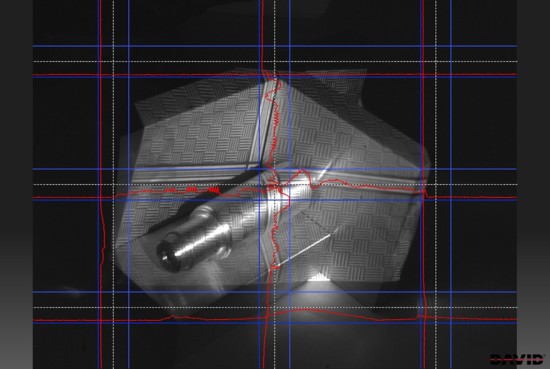 Single scan result with conventional SL (DAVID4): 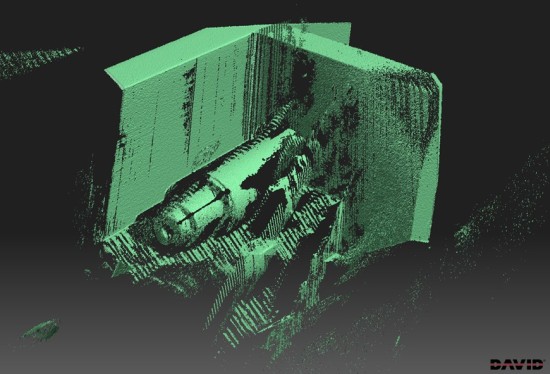 Exactly the same setup scanned with DAVID5: 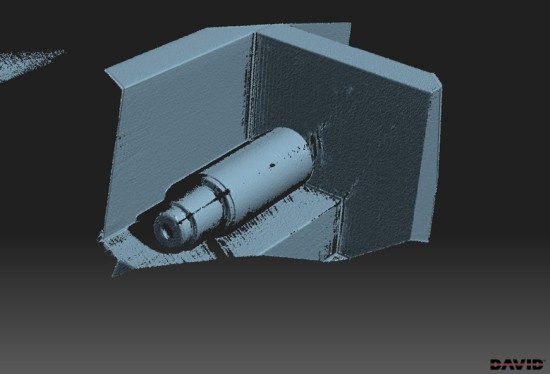
0 Comments
With the new DAVID 5 software, the DAVID 3D scanning solutions can now support 3D scanning using two cameras! 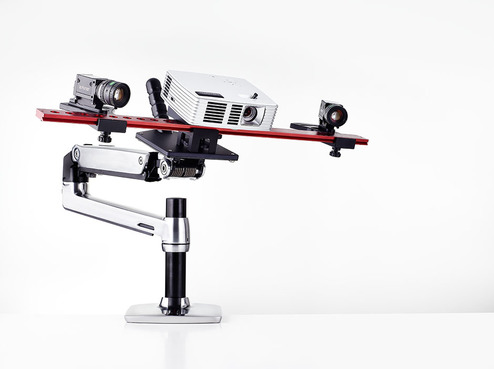 There are two modes: "Stereo" and "Extended View". Compared to one camera (mono), stereo will give you an improved scan precision. The Extended View mode, as the name suggests, covers more surface region in one scan. Of course 3D scanning with just one camera is also possible with DAVID5 as well but with dual camera your 3D scanning possibilities can extend further.
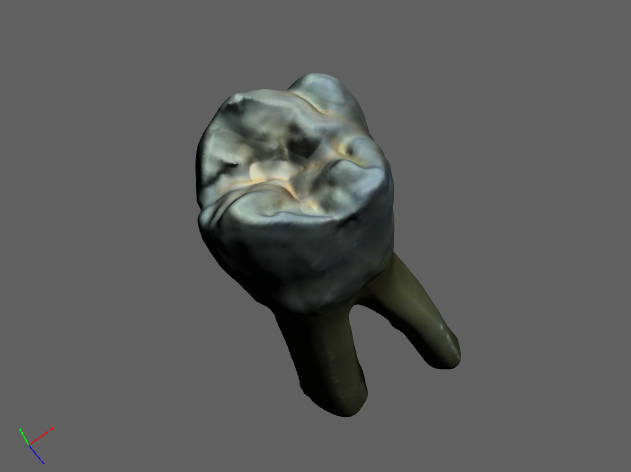
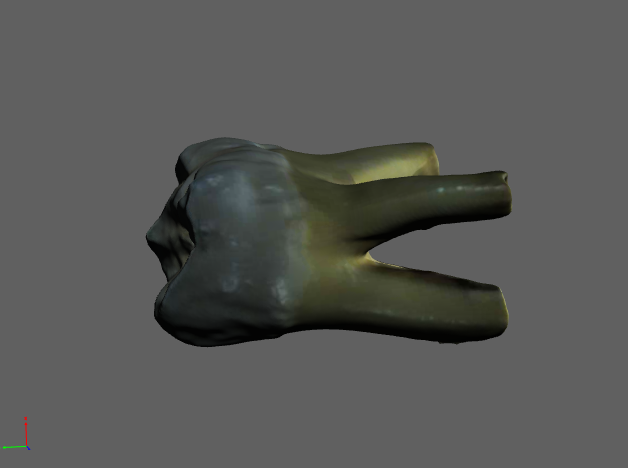
Growshapes's customer, Eric Schultz of the Western New York Osteological Survey who studies bones, made a video for Growshapes to explain how he managed to 3D scan a very small object - a human molar that is 5mm in diameter! Eric made considerable modifications to the DAVID 3D Scanner SLS-2 set up to 3D scan this tiny tooth, so we wanted to share with you how he adapted the system and how you how flexible the DAVID 3D scanner solutions are. The Western New York Osteological Survey's mission is to creates digital images for skeletal structures of animals and his team is creating a digital reference manual which aims to become a comprehensive survey of all osteological elements of fauna in Western New York. Eric used the DAVID Structured Light 3D Scanner SLS-2 in order to capture highly accurate digital models. The minimum scan size achieved by DAVID SLS-2 with the standard setting is 60mm, so in order for Eric to 3D scan the target object that was only 5mm diameter, he had to appy modifications to the camera lens, the calibration panel, as well as the scanning process, all of which can be seen in the videos below. You will see how DAVID 3D scanners can be adapted to go beyond its standard capability and this philosophy is continued onto the later SLS-3 model as well. STEP 1: SETTING UP THE SYSTEM - SLS-2 + AUTOMATED TURNTABLE Key customization points for 3D scanning very small objects:
Eric customized the DAVID scanner by replacing the original camera lens with a lens that allow to focus on smaller objects. He also used DAVID’s calibration panels that comes with the software to print out his own panel to fit the very small object size. The scanning environment consisted entirely of black materials, such as a black desk, black backdrop, black equipment and nearly pitch black lighting. Additionally he used black clay to create a foundation on the turntable for the tooth to stand upon. The scanner picks up little detail from the black clay which minimizes the editing of the scanned images. Other points to consider for enabling a successful 3D scan is the distance between camera and projector which is adjusted on red bar.
Good starting point of distance between camera and projector Eric suggests is 118mm and with camera at 25 degree angle. Camera needs to be level with the calibration panel as well, which in normal scan is not the case as the camera is usually placed higher than the calibration panel. Also calibration needs to be rotated to ensure the points are on the screen so it can be visible with the target. Here is a 5 minute video of the set up. STEP 2: CALIBRATING, SCANNING, FUSING AND CLEANING UP THE FILEWatch the 14 minute video below on the calibration, scanning, fusing, clean up steps to see how the final digital 3D scan file are created. STEP 3: PRINTING OUT THE RESULTSBelow are the results of the highly detailed color 3D digital image of a human molar scanned using DAVID SLS-2. ERIC's COMMENT ABOUT THE DAVID 3D SCANNING SOLUTION"At the price point of $3,275 my budget allowed I examined two 3D scanners, the Next engine and the DAVID SLS-2 3D scanner. The Next Engines primary allure is its claim to autonomously create a 3D model with its rotating robotic arm. I found this very appealing. Unfortunately, I quickly learned that the system has several hidden fees to bring about full functionality.
The DAVID SLS-2 system came with everything I needed to get started with no software limitations. The system is made of several separate components. It comes with a camera, lens, projector, calibration panel, software dongle, and alignment rod/tripod. If any one of these components break or burn out they can be individually replaced. Additionally, the camera utilizes standard C-mount CCTV lenses, this is a considerable strength. For example, I have been imaging individual teeth and the native camera was not quite adequate. With the Next Engine the same inadequacy was the end of the project. With the David system I found a set of extension tubes for $10.00 on Amazon which allowed me to change the focal length of the lens and focus closer resulting is a very high quality image. With my ability to add common aftermarket components I am able to push the limits of the system beyond the manufacturers specifications. For example, I have added a zoom lens to my system and am working on creating a model of an opossum’s molar. For those of you unfamiliar this is a very small tooth measuring 5mm in width. My results thus far are promising." Another key aim of this survey is to create a digital catalog for students and inspire them to explore STEM (Science, Technology, Engineering and Mathematics). A significant part of this digital manual will be 3D scans of bones so students can view their shape and structure. Science departments in school and scientific organizations are constantly seeking state of the art methods and technologies to engage and stimulate students in science and is great to hear the DAVID 3D scanner is making contributions!
Go to the store page to see all the amazing DAVID 3D scanner options available from Growshapes. Thank you Eric for pushing the limits of what is possible with the amazing DAVID 3D scanner and sharing your experience with Growshapes!
|
GrowshapesProvider of leading edge 3D scanning products and services. We see 3D! Archives
July 2024
Categories
All
|

 RSS Feed
|
Vertical Divider
GROWSHAPESStay connected |
Menu |


|
©2024 Growshapes LLC. All rights reserved.