Shining 3D | EinScan 3D Scanner FAQ
Basic Questions
Q1. What can I 3D scan with Shining 3D Einscan 3D scanners?
Generally, you can scan all visible objects that are non transparent, not too dark, not-too-shiny surfaces that do not move for at least a few seconds of scanning time. Structured light 3D scanners need to cast light patterns onto the object in order to capture the surface features, thus dark objects absorbs light, transparent objects cannot project the light patterns and shiny objects reflects light. Inside cavities or holes cannot be captured unless it is fully visible.
The best objects to scan with EinScan 3D scanners by Shining 3D are:
If you need to scan dark objects, you need to powder coat it with white powder, even spray such as this, which works surprisingly well. For scanning hair, you can use dry shampoo. Transparent objects cannot be scanned as the structure light pattern cannot be projected onto the surface. For dark surfaces the use the Einscan HX with blue laser scan mode.
Q2. How does the EinScan 3D scanners work?
EinScan 3D scanners use structured light technology, laser and infra red which casts light patterns onto an object. The 3D scanner produces an accurate 360° digital representation of the physical object by fusing single dimension scans that are captured at different angles. The 3D scanner captures the 3D surfaces as a triangle net (point cloud plus connecting triangles) at accurate scale. If you were curious how to scan an object for 3D printing, check this detailed article out. Basically capture the surface dimension of the object as a .stl file then export to your 3D printing software to create the optimal output for your chosen 3D printer.
Q3. What does the 3D scan output look like?
Check out scan files on sketchfab: https://sketchfab.com/einscan
Q4. I cannot open the 3D scan software. What do I need to do?
Is the Antivirus running? Is Windows and Graphic card up to date? Is the camera setting of Windows On? Check admin rights, cameras are working in the device manager cameras and reinstall.
Q4. The 3D scanner says it's "offline". How do I connect the 3D scanner to the software?
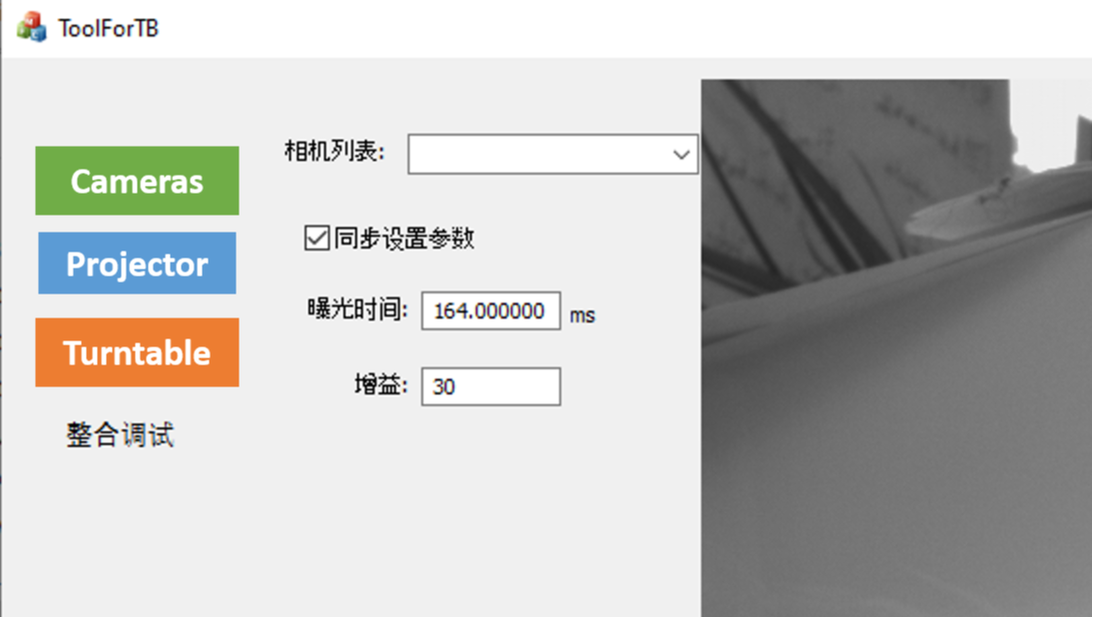
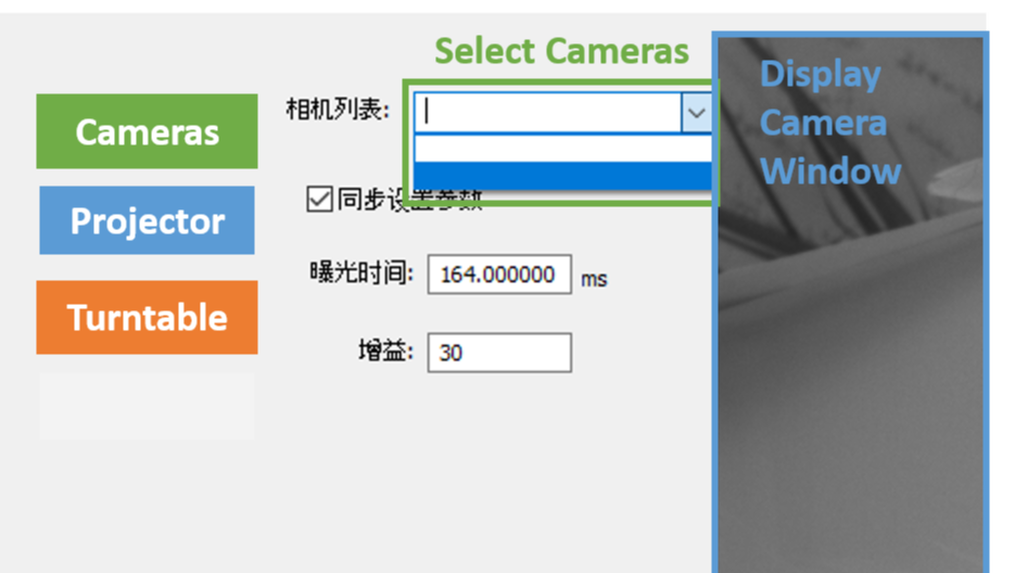
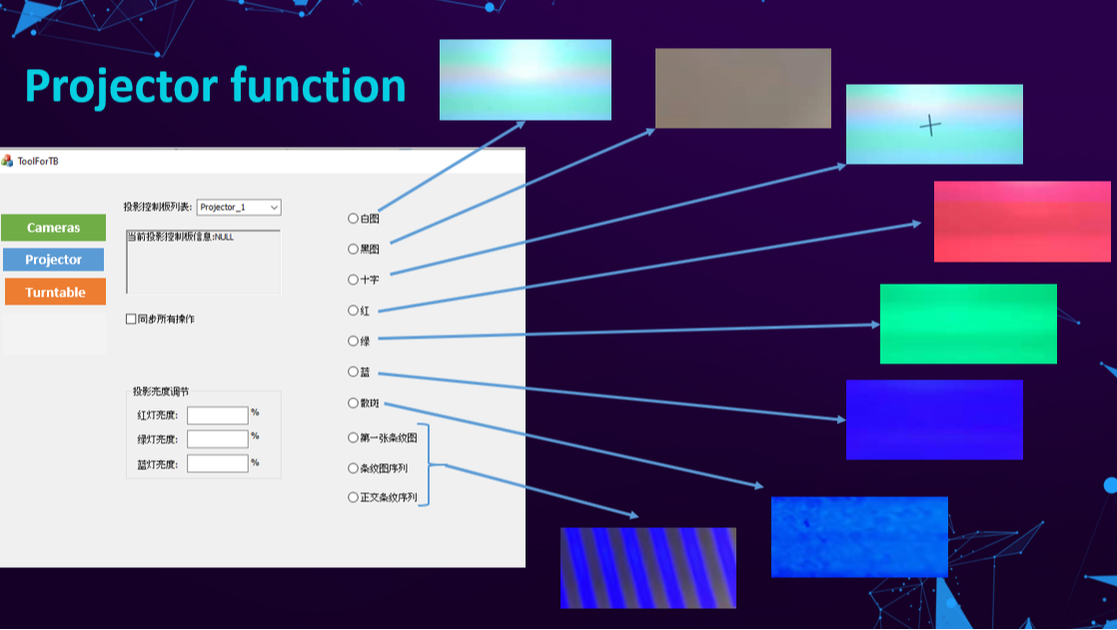
Check that the green LED for the power supply is on. Are the fans running? Do you see the 3D scanner in device manager? Do the cables look okay? Test the other USB port. Test with projector tool (scroll down to download tool) to see if cameras are working.
Q5. Why am I not seeing any 3D scan data in the software?
Are all the hardware components all working? Did you finish the calibration process correctly? Check that Windows and graphics card are up to date and ensure that antivirus software is not interfering.
Q6. EinScan SE/SP calibration keeps failing, what do I need to do?
Disable ALL other cameras/imaging devices on you PC and disable antivirus software. Ensure there are no scratches on your calibration board.
Q7. EinScan Pro Handheld Scanner is not calibrating, what do I need to do?
1. Make sure you thoroughly follow the steps for calibration process: Please check the calibration board position is correct, as well as the scanner position. You can refer to the support video for each step, displayed on the left of the calibration screen.
2. Avoid direct sources of light: If environmental light is too bright, or direct source of light (e.g. solar light from a window, light from a lamp) might reflect on your calibration board, the image acquisition may not be successful, leading to failed calibration.
Please try avoiding such sources of light or running calibration in a darker room.
3. Try a different USB3 port: Despite being the scanner recognized by the PC and software, it might be that the current USB3 port can not deal with video. Try connecting the scanner to a different USB3 port. We encourage updating the USB3 drivers and checking for Windows updates.
4. Do not be too fast (only for handheld scanners): Just like when taking pictures normally with your phone or camera, moving fast while shooting can lead to blurry pictures. Hold the scanner firmly and move continuously at a moderate speed to ensure data acquisition quality.
5. Are all LEDs blinking? (only for handheld scanners): In case all LEDs are not brightly blinking during calibration, it might also be causing it to fail. LEDs malfunction is due to a hardware issue. We recommend contacting Shining 3D support as soon as possible so we can take care of the faulty device.
Q8. Scans are not aligning, what's wrong?
Recalibrate your 3D scanner. Ensuring the 3D scanner is calibrated adequately is important to ensure you can capture and align the 3D scans.
Q9. Turntable is not connecting on SE/SP, how can I fix it?
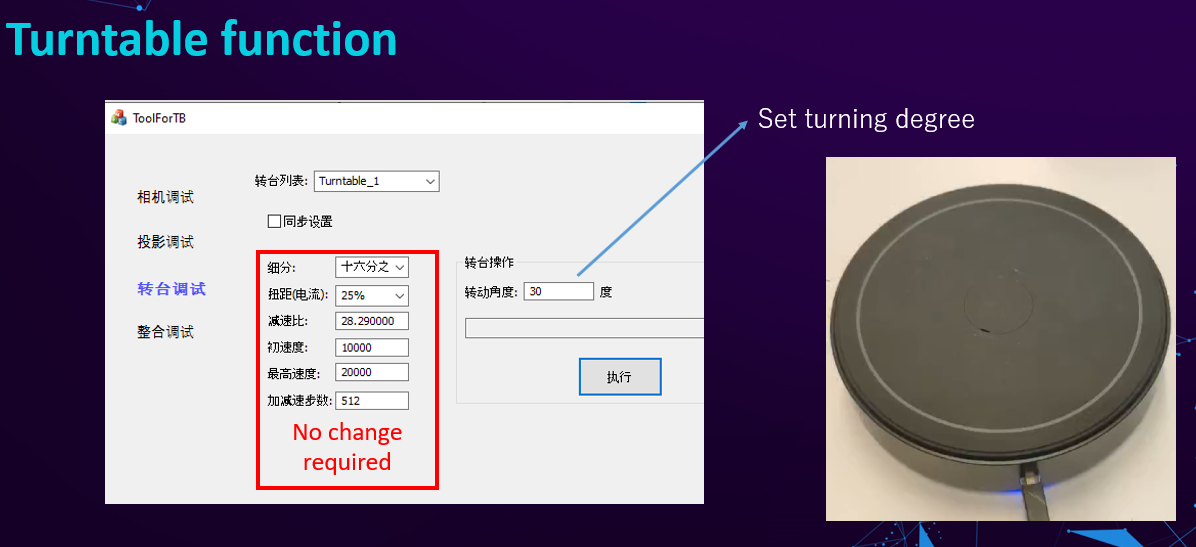
Make sure you have Windows 10 vers. 1903, Software 2.7.0.8 installed on your PC. The blue light needs to be on. Test with Projector Tool (scroll below to download Projector Tool)
Q10. Which scan mode should I use for EinScan Pro Series?
Q11. What are the differences of human body scanning between EinScan H and EinScan Pro series?
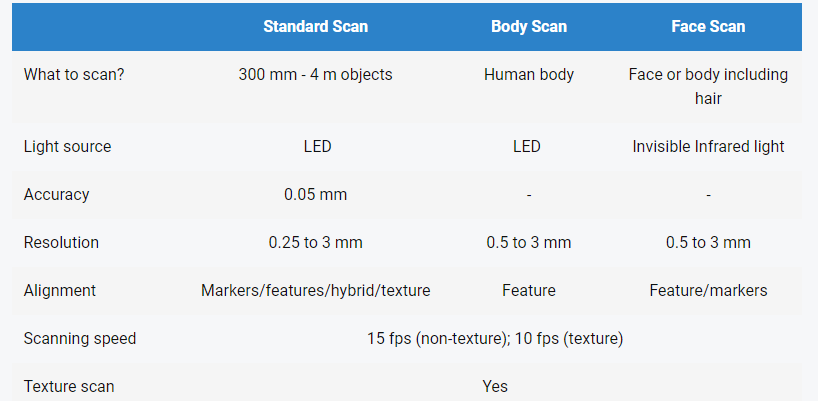
EinScan H has a larger single scanning range than EinScan Pro series which smoothes human body scanning enormously. The optimized alignment algorithm in Body Scan mode of EinScan H enables efficient alignment despite small movements of the scanned object or person. Using EinScan H to scan the human body is much be easier and faster. The dedicated Face scanning mode of EinScan H which is equipped with an invisible infrared light source provides a reliable solution to the problem of acquiring dark-colored objects and enables an easy acquisition of human hair and simultaneously a safe and comfortable scanning process.
Q12. What are the best applications of EinScan HX?
By integrating blue light and laser, EinScan HX can be used in a wide range of applications with less limitation. Up to 1,200,000 points/s under rapid scan mode enable EinScan HX to scan large objects with high efficiency. Laser scanning technology enables EinScan-HX to an amazing performance in scanning reflective and dark objects. Minimum point distance of 0.05mm and up to 0.04 accuracy make EinScan-HX suitable for reverse engineering and measuring. We could say EinScan-HX is a powerful scanner for applications, such as automotive, shipbuilding, machining, and research.
Q13. What is the difference between, laser, blue light and white light for 3D scanning?
Blue laser is a stronger light source, predestined to capture dark and reflective surfaces. As blue light occurs at a much lesser rate in our usual environment, it is used as a light source in 3d scanning avoiding heavy environment light interference and delivering a much better performance in this case compared to white light.
Q14. I can't seem to scan challenging objects. What are some tips and tricks?
Check this out!
Q1. What can I 3D scan with Shining 3D Einscan 3D scanners?
Generally, you can scan all visible objects that are non transparent, not too dark, not-too-shiny surfaces that do not move for at least a few seconds of scanning time. Structured light 3D scanners need to cast light patterns onto the object in order to capture the surface features, thus dark objects absorbs light, transparent objects cannot project the light patterns and shiny objects reflects light. Inside cavities or holes cannot be captured unless it is fully visible.
The best objects to scan with EinScan 3D scanners by Shining 3D are:
- Opaque, not translucent/transparent
- Not-too-shiny surfaces
If you need to scan dark objects, you need to powder coat it with white powder, even spray such as this, which works surprisingly well. For scanning hair, you can use dry shampoo. Transparent objects cannot be scanned as the structure light pattern cannot be projected onto the surface. For dark surfaces the use the Einscan HX with blue laser scan mode.
Q2. How does the EinScan 3D scanners work?
EinScan 3D scanners use structured light technology, laser and infra red which casts light patterns onto an object. The 3D scanner produces an accurate 360° digital representation of the physical object by fusing single dimension scans that are captured at different angles. The 3D scanner captures the 3D surfaces as a triangle net (point cloud plus connecting triangles) at accurate scale. If you were curious how to scan an object for 3D printing, check this detailed article out. Basically capture the surface dimension of the object as a .stl file then export to your 3D printing software to create the optimal output for your chosen 3D printer.
Q3. What does the 3D scan output look like?
Check out scan files on sketchfab: https://sketchfab.com/einscan
Q4. I cannot open the 3D scan software. What do I need to do?
Is the Antivirus running? Is Windows and Graphic card up to date? Is the camera setting of Windows On? Check admin rights, cameras are working in the device manager cameras and reinstall.
- Check for latest software version from the following link: https://www.einscan.com/support/download/
- Make sure all the Antivirus software are closed or adding the Shining3D folder to the whitelist.
- Go to Device Manager Command, enable Shining 3D camera while disabling all other cameras
- Make sure the camera setting of Windows is ON by open
- Setting-Privacy-Camera-Allow APP to access the camera
- Right-click and select 'Run as Administrator'
- Try to reinstall the software
- Check if Windows and Graphic Card are up to date (Nvidia Graphic cards GTX660, Quadro P1000 or above)
Q4. The 3D scanner says it's "offline". How do I connect the 3D scanner to the software?
Check that the green LED for the power supply is on. Are the fans running? Do you see the 3D scanner in device manager? Do the cables look okay? Test the other USB port. Test with projector tool (scroll down to download tool) to see if cameras are working.
Q5. Why am I not seeing any 3D scan data in the software?
Are all the hardware components all working? Did you finish the calibration process correctly? Check that Windows and graphics card are up to date and ensure that antivirus software is not interfering.
Q6. EinScan SE/SP calibration keeps failing, what do I need to do?
Disable ALL other cameras/imaging devices on you PC and disable antivirus software. Ensure there are no scratches on your calibration board.
Q7. EinScan Pro Handheld Scanner is not calibrating, what do I need to do?
1. Make sure you thoroughly follow the steps for calibration process: Please check the calibration board position is correct, as well as the scanner position. You can refer to the support video for each step, displayed on the left of the calibration screen.
2. Avoid direct sources of light: If environmental light is too bright, or direct source of light (e.g. solar light from a window, light from a lamp) might reflect on your calibration board, the image acquisition may not be successful, leading to failed calibration.
Please try avoiding such sources of light or running calibration in a darker room.
3. Try a different USB3 port: Despite being the scanner recognized by the PC and software, it might be that the current USB3 port can not deal with video. Try connecting the scanner to a different USB3 port. We encourage updating the USB3 drivers and checking for Windows updates.
4. Do not be too fast (only for handheld scanners): Just like when taking pictures normally with your phone or camera, moving fast while shooting can lead to blurry pictures. Hold the scanner firmly and move continuously at a moderate speed to ensure data acquisition quality.
5. Are all LEDs blinking? (only for handheld scanners): In case all LEDs are not brightly blinking during calibration, it might also be causing it to fail. LEDs malfunction is due to a hardware issue. We recommend contacting Shining 3D support as soon as possible so we can take care of the faulty device.
Q8. Scans are not aligning, what's wrong?
Recalibrate your 3D scanner. Ensuring the 3D scanner is calibrated adequately is important to ensure you can capture and align the 3D scans.
Q9. Turntable is not connecting on SE/SP, how can I fix it?
Make sure you have Windows 10 vers. 1903, Software 2.7.0.8 installed on your PC. The blue light needs to be on. Test with Projector Tool (scroll below to download Projector Tool)
Q10. Which scan mode should I use for EinScan Pro Series?
- Handheld Rapid Scan: Most popular form of alignment. This mode allows the user to scan objects without the use of markers at a fast pace and with an accuracy of up to 0.1mm (100 microns). It is ideal at scanning objects with defining characteristics or features such as human faces, detailed furniture, medium to large sized sculptures, and larger objects that meet the requirements. The ideal size of the objects can vary but Handheld Rapid Scan mode is best used on medium to large size objects. To scan objects with few geometry features, like flat or plain surface, symmetric shape like cylinder, ball etc, you need put markers randomly on object surface to create features for scanner to identify. At least 4 markers must be visible per scan
- Handheld HD Mode: The more accurate handheld scan mode that requires markers when scanning. This mode allows the user to scan objects that require higher precision and detail with an accuracy of up to .05mm (50 microns) and better geometry resolution. As with the other handheld mode, it is best used on medium objects. Some good examples of Handheld HD scans can include high detailed industrial pieces, furniture, art pieces that require rich features resolution and higher accuracy. Handheld HD Scan mode can’t work with Color Pack for color data. If equipped with HD Prime Pack (Pro 2X Plus), Handheld HD Scan mode can achieve faster scanning experience without placing markers on object with rich geometry features, such as art pieces, statues etc.
- Fixed Scan Mode: Fixed Scan mode trades the flexibility of the handheld modes for the high precision, high resolution and automates the whole 3D scan process. It is the ideal way to scan smaller objects and achieves and accuracy of up to .04mm (40 microns) and is capable of scanning with and without markers. Fixed Scan mode also allows the use of the Industrial Pack’s add-on automated turntable to create automated scans that are stitched together in real time through the EXScan software. The general rule of thumb is that is an object is small enough to fit the turntable included with the EinScan Pro 2X’s Industrial pack then it is better off being scanned in the automated Fixed Scan mode. This ensures the most precise scan while reducing the room for errors and simplifying the workflow.
Q11. What are the differences of human body scanning between EinScan H and EinScan Pro series?
EinScan H has a larger single scanning range than EinScan Pro series which smoothes human body scanning enormously. The optimized alignment algorithm in Body Scan mode of EinScan H enables efficient alignment despite small movements of the scanned object or person. Using EinScan H to scan the human body is much be easier and faster. The dedicated Face scanning mode of EinScan H which is equipped with an invisible infrared light source provides a reliable solution to the problem of acquiring dark-colored objects and enables an easy acquisition of human hair and simultaneously a safe and comfortable scanning process.
Q12. What are the best applications of EinScan HX?
By integrating blue light and laser, EinScan HX can be used in a wide range of applications with less limitation. Up to 1,200,000 points/s under rapid scan mode enable EinScan HX to scan large objects with high efficiency. Laser scanning technology enables EinScan-HX to an amazing performance in scanning reflective and dark objects. Minimum point distance of 0.05mm and up to 0.04 accuracy make EinScan-HX suitable for reverse engineering and measuring. We could say EinScan-HX is a powerful scanner for applications, such as automotive, shipbuilding, machining, and research.
Q13. What is the difference between, laser, blue light and white light for 3D scanning?
Blue laser is a stronger light source, predestined to capture dark and reflective surfaces. As blue light occurs at a much lesser rate in our usual environment, it is used as a light source in 3d scanning avoiding heavy environment light interference and delivering a much better performance in this case compared to white light.
Q14. I can't seem to scan challenging objects. What are some tips and tricks?
Check this out!
- CAD Software Compatibility: EinScan exports mesh data in formats like STL, OBJ, PLY, which may not work directly with traditional CAD software that prefers formats like IGES or STEP. You may need to use Reverse Engineering software to convert the mesh data into a CAD-compatible format. EinScan provides Solid Edge SHINING 3D edition for this purpose.
- Scanning Dark Objects: To scan dark objects, you can increase the scanner's brightness, but this may introduce more noise. HDR (High Dynamic Range) mode can help capture contrasting data. Applying a thin layer of scan spray or using DIY solutions like flour or baby powder on the object's surface can also improve results.
- Scanning Thin Objects: Thin objects can be challenging due to interference between the two faces. Using markers can help improve accuracy when scanning thin objects.
- Post-processing Data: The EinScan software offers various mesh editing options, including making models watertight or not, simplifying the mesh, filling holes, and adjusting brightness and contrast. You can also use external software like MeshLab, MeshMixer, or Geomagic Wrap for more advanced post-processing.
- Autoscan Mode: The "fixed" and "auto scan" modes have been merged into a single "scan" mode. You can enable or disable the turntable based on your needs.
- Alignment Conditions for EinScan-SP:
- Coded Target: Use this when the object is small and doesn't cover the coded targets on the turntable. The scanner recognizes common targets on the turntable for alignment.
- Feature Alignment: Suitable for larger objects that can't use coded targets. The software recognizes features on preliminary scans to calculate turntable positions.
- Marker or Global Markers: For larger objects that can accept markers. The software matches scans by recognizing common markers.
1. Mesh Data vs. CAD Data
2. Scanning Hair
3. Rapid Scan Modes
4. Graphics Card Optimization
5. Scanning Dark Objects
6. Challenges with Scanning Large Objects
7. Mesh Editing with EXScan Pro Key Features
8. EinScan Pro HD/2X/2X Plus - "Unknown Software Error
- The EinScan exports mesh data (STL.OBJ. PLY. etc…), as a high precision 3D digital file and they are composed of a large number of triangle (polygons). Traditional CAD software reads parasolid files (IGES, STEP/STP etc…), these files are composed of a set of shapes that are mathematically defined. Therefore, for CAD software a mesh is interpreted as a very large number of planes. Often the direct conversion from mesh to CAD format is limited to small files.
- The transformation from mesh to CAD data is called Reverse Engineering. The mesh is imported into the CAD interface and is used as a visual or matching reference for the construction of the CAD model.
- SHINING 3D has developed partnerships with multiple software companies providing Reverse Engineering solutions among them, Solid Edge, Rhino & mesh2surface, DesignX, and Geomagic for Solidworks
2. Scanning Hair
- Scanning hair can be challenging due to light reflections. Better to capture with Einscan H
- Applying dry shampoo or matte color spray can help make hair easier to scan.
- Post-processing hair in 3D modeling software requires advanced skills
3. Rapid Scan Modes
- Classic: 15 frames/sec, direct scan with selected resolution, good for small parts and medium resolution scan
- Lightening: 30 frames/sec, 3D scan with 1mm resolution, interpolation for selected resolution, good for large parts with low resolution.
- Lightening + Refine: 30 frames/sec, scan with 1mm resolution, parallel capture of frame data, refine to selected resolution after scan, good for large parts and allows for recalculation of the resolution
4. Graphics Card Optimization
- EXScan Pro is optimized for Nvidia GTX graphic cards and requires certain number of CUDA cores. The resources allowed for 3D scanning are different to that required for CAD or gaming.
- Using other graphics cards may result in software lag or crashes.
5. Scanning Dark Objects
- At the optimal working distance, increase brightness for better scanning results.
- Apply spray on the surface before scanning for improved data capture. Flour or baby powder can do the trick as well.
6. Challenges with Scanning Large Objects
- Numerical limits of software
- Maximum distance in one direction is 4m. The size limit is 8000 X point-distance. Reduce the resolution to achieve singular large scan data
- Cumulative error occurs with increased distance. Start from the middle of the object and follow a spider path towards the edges to reduce risk of tracking loss.
- Use markers for tracking to handle large object scans.
7. Mesh Editing with EXScan Pro Key Features
- Watertight or unwatertight models.
- Mesh simplification via mesh decimation
- Hole filling respecting curvature for unwatertight models with up to 100mm permiter
- Sharpening and smoothing options.
- Brightness and contrast adjustments for textures
- Additional mesh editing can be done with free software such as options can be found in software like Meshlab and Meshmixer
8. EinScan Pro HD/2X/2X Plus - "Unknown Software Error
Step 1
Step 2
- Check that your PC is configured correctly following the steps from this article
- Once this has been verified, restart the program (EXScan Pro) and check if the error message still pops up.
- If the error message persists, check the address to which the projects are being saved. It is possible that all projects are being saved by default to a OneDrive folder on your PC, rather than to your PC's local storage.
Step 2
- If you are selecting "New Project Group", a new folder must be created in "local" storage
- If you want to use the exact same folder you were using until now, manually copy and paste it into a new directory that is local rather than online/OneDrive.
- Close the program (EXScan Pro)
- Find the folder with the projects we were working on
- Copy/cut + paste it on the desktop to ensure that it has been saved locally
- Start the program again (EXScan Pro)
- In the "Open Project Group" tab, manually select the folder saved on the desktop.
- Close the program (EXScan Pro)
Standard Scan Mode
Recommended for:
Not recommended for:
The usual techniques to deal with objects with black, transparent, shiny or reflective surfaces, as well as objects with less features or repetitive patterns, also apply to this scanner.
Body Scan Mode
Recommended for:
Face Scan Mode (IR Mode)
Recommended for:
- Target object sizes that are 300 mm to 4 m.
- Objects with good geometry, features or texture
Not recommended for:
- Moving or vibrating objects or soft materials as trembling will cause misalignment.
- Lattice structure with many small deep holes as the holes may not be detected due to its large scanning area
The usual techniques to deal with objects with black, transparent, shiny or reflective surfaces, as well as objects with less features or repetitive patterns, also apply to this scanner.
Body Scan Mode
Recommended for:
- Scanning human body, partial or fully, except for hair. Face Scan mode is required to scan hair.
- The alignment algorithm has been optimised to deal with non-rigid objects. It is thus usually referred to as non-rigid alignment.
- This alignment mode, which is by default set to Feature Alignment, can deal with shapes that are likely to change, within a certain range. This is the case of human body, which moves due to the breathing or its inherent trembling.
- For a better performance, wear clothes with low contrast. If the subject wears white and black colors, the operator will need to continuously adjust the brightness.
- Since hair cannot be captured in good quality in this mode, wrapping the hair before scanning to prevent it from covering the body is advised.
- Another option is to use dry shampoo to capture the hair better with this mode.
Face Scan Mode (IR Mode)
- The Face Scan mode offers two aligning modes: Marker alignment and Feature alignment. The latter uses a non-rigid alignment.
- The Infrared light source from Face Scan mode helps capturing hair data and is easy on the eyes of the person being scanned. Some considerations are to be taken, which can be seen below.
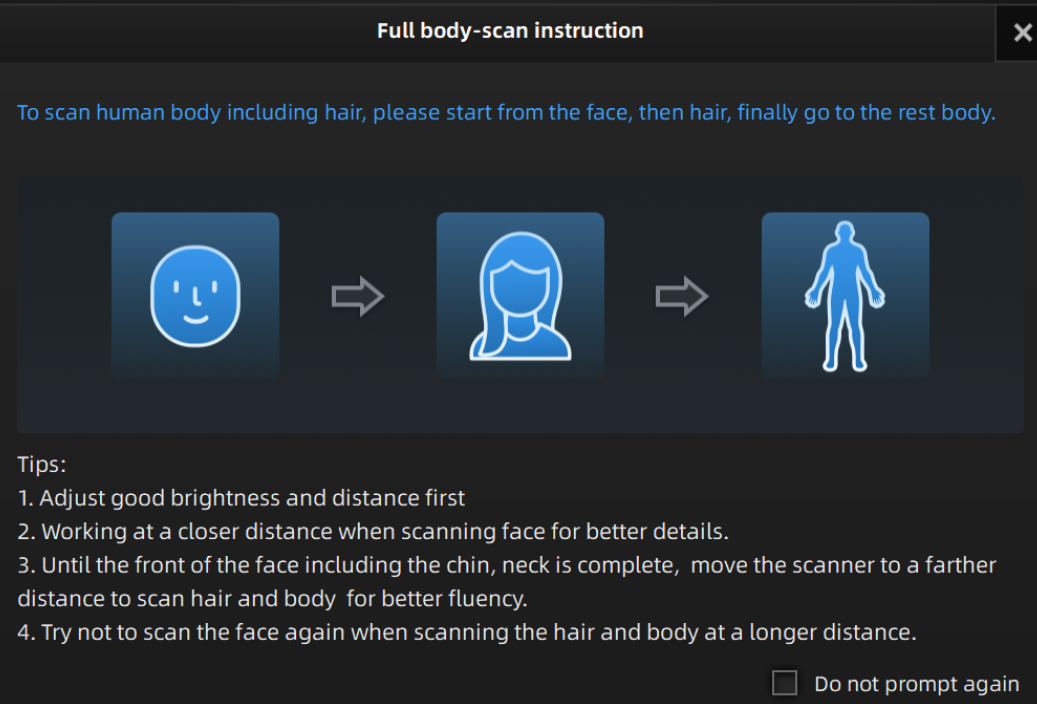
- Once you start a new work in Face Scan mode, some tips to successfully scan a complete person in Face Scan mode are provided.
- For hair, keep in mind not all haircuts are easy to scan. Light needs to be projected onto the hair so the scanner can detect it. Therefore, spiky hair, the tips of the hair, thin tufts of hair are difficult to scan since the light cannot be projected there. It is therefore advised to comb the hair to obtain a even, smooth surface.
The EinScan HX by Shining 3D is a handheld 3D scanner offering a unique digital technology that can 3D scan objects using blue structured light and blue laser. This hybrid function of laser scanner and structured light scanner makes this 3D scanner a very useful tool for research, development and reverse engineering. Let's look at the differences between laser scanning and structured light scanning.
Common Features
Features that are different based on the 3D scan mode
1. Rapid Scan Mode (Structured Light Scanning with Blue LED light)
Strengths:
Limitations:
2. Laser Scan Mode ( 7 Blue Crossing Laser Lines 3D Scan)
Strengths:
Limitations:
Common Features
- Both can scan the same target object size : 300mm-4m
- Both uses markers, but in Rapid Mode with Blue Light it can further align with textures and features
- Both are non-contact, destruction free measurement system
- Both offer high precision 3D digital surface model of the object scanned
Features that are different based on the 3D scan mode
1. Rapid Scan Mode (Structured Light Scanning with Blue LED light)
Strengths:
- Captures more data at once on one surface. Which makes scanning faster
- The light source is safe for the human eye even for longer scanning (that's top for scanning people)
- Can capture textures
- Scans can be stitched together using geometry, markers or texture
Limitations:
- Problems with other light sources, making outdoor scanning very difficult
- Not quite as accurate as a laser scanner but close to it
- Lower resolution then laser
2. Laser Scan Mode ( 7 Blue Crossing Laser Lines 3D Scan)
Strengths:
- Better for dark and reflective surfaces
- Not as susceptible to other light sources, so easier to scan outdoors.
- Accuracy is a bit better compared to structure light mode
- higher resolution then rapid mode
Limitations:
- Must align scan using markers
- No texture capturing is possible
- Laser is dangerous to the human eye
|
|
|
Application Questions: What can I do with the scan data?
Q1. Does EinScan 3D scan files work with CAD software such as Solidworks?
The 3D images generated by EinScan 3D scanners are a “point cloud” mesh. This can be exported in industry standard .stl, .obj and .ply file formats. Each pixel of the camera sensor represents a point in the point cloud, so potentially these file types may contain much more data than a traditional, parametric solid, CAD program may be able to handle.
Usually 3D scan data generats a large file thus reducing mesh density maybe necessary prior to export the files. You can try .stl file editors such as Blender, MeshLab and MeshMixer, all of which are free to download.
You can also buy the EinScan Reverse Engineering Bundle which gives you an end to end solution from 3D scan, file editing to reverse engineering with CAD.
Q2. Can the 3D scan data be used for 3D printing or milling?
Yes. Shining 3D does not create a machine program that drives your printer/CNC, but these machines usually have software that can import 3D triangle meshes. They usually require a water-tight 3D model, a model which has no holes, so that inside and outside are clearly defined. Ensure you save the scan as water tight models.
Q3. What software can I use for 3D measurements?
MeshLab is free and offers point-to-point distance measurements. Rhino3d and Geomagic are other powerful 3D software programs.
Q4. Can I export point clouds?
EinScan scan software exports to the OBJ file format. It is an ASCII text file that contains a 3D point cloud plus triangles, surface normals, and texture coordinates. If you are interested only in the point cloud, read all lines that start with V. Each line stores the X, Y, Z coordinates of one 3D point. The reference coordinate system is the center of the calibration corner, with the Y axis pointing upward.
Q5. Can I import the 3D scan files into my 3D software?
Look for an import function for OBJ, STL, or PLY files in your software. Some programs might require an import plugin (with or without cost).
You might also be able to find a conversion tool to convert OBJ or STL into the format that you need.


